
This post may contain affiliate links. Please read our disclosure policy.
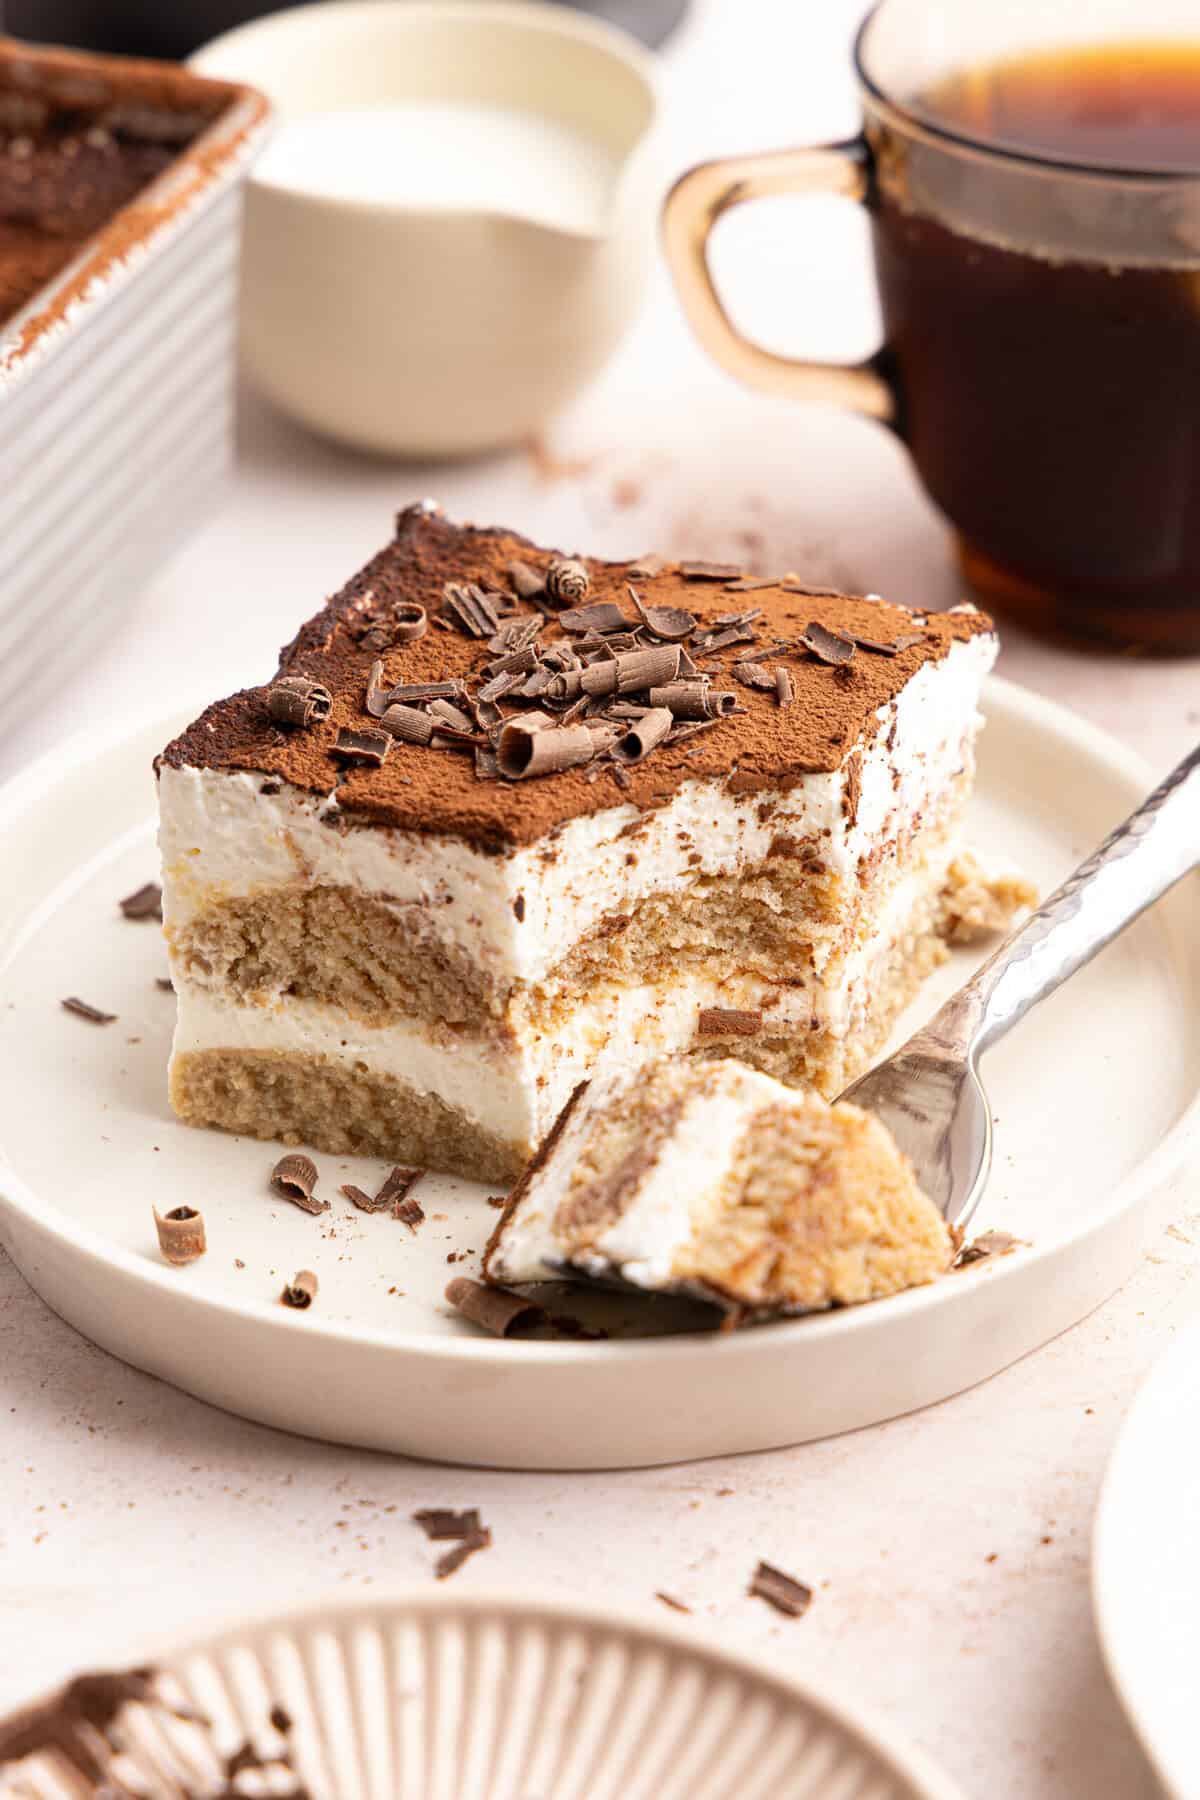
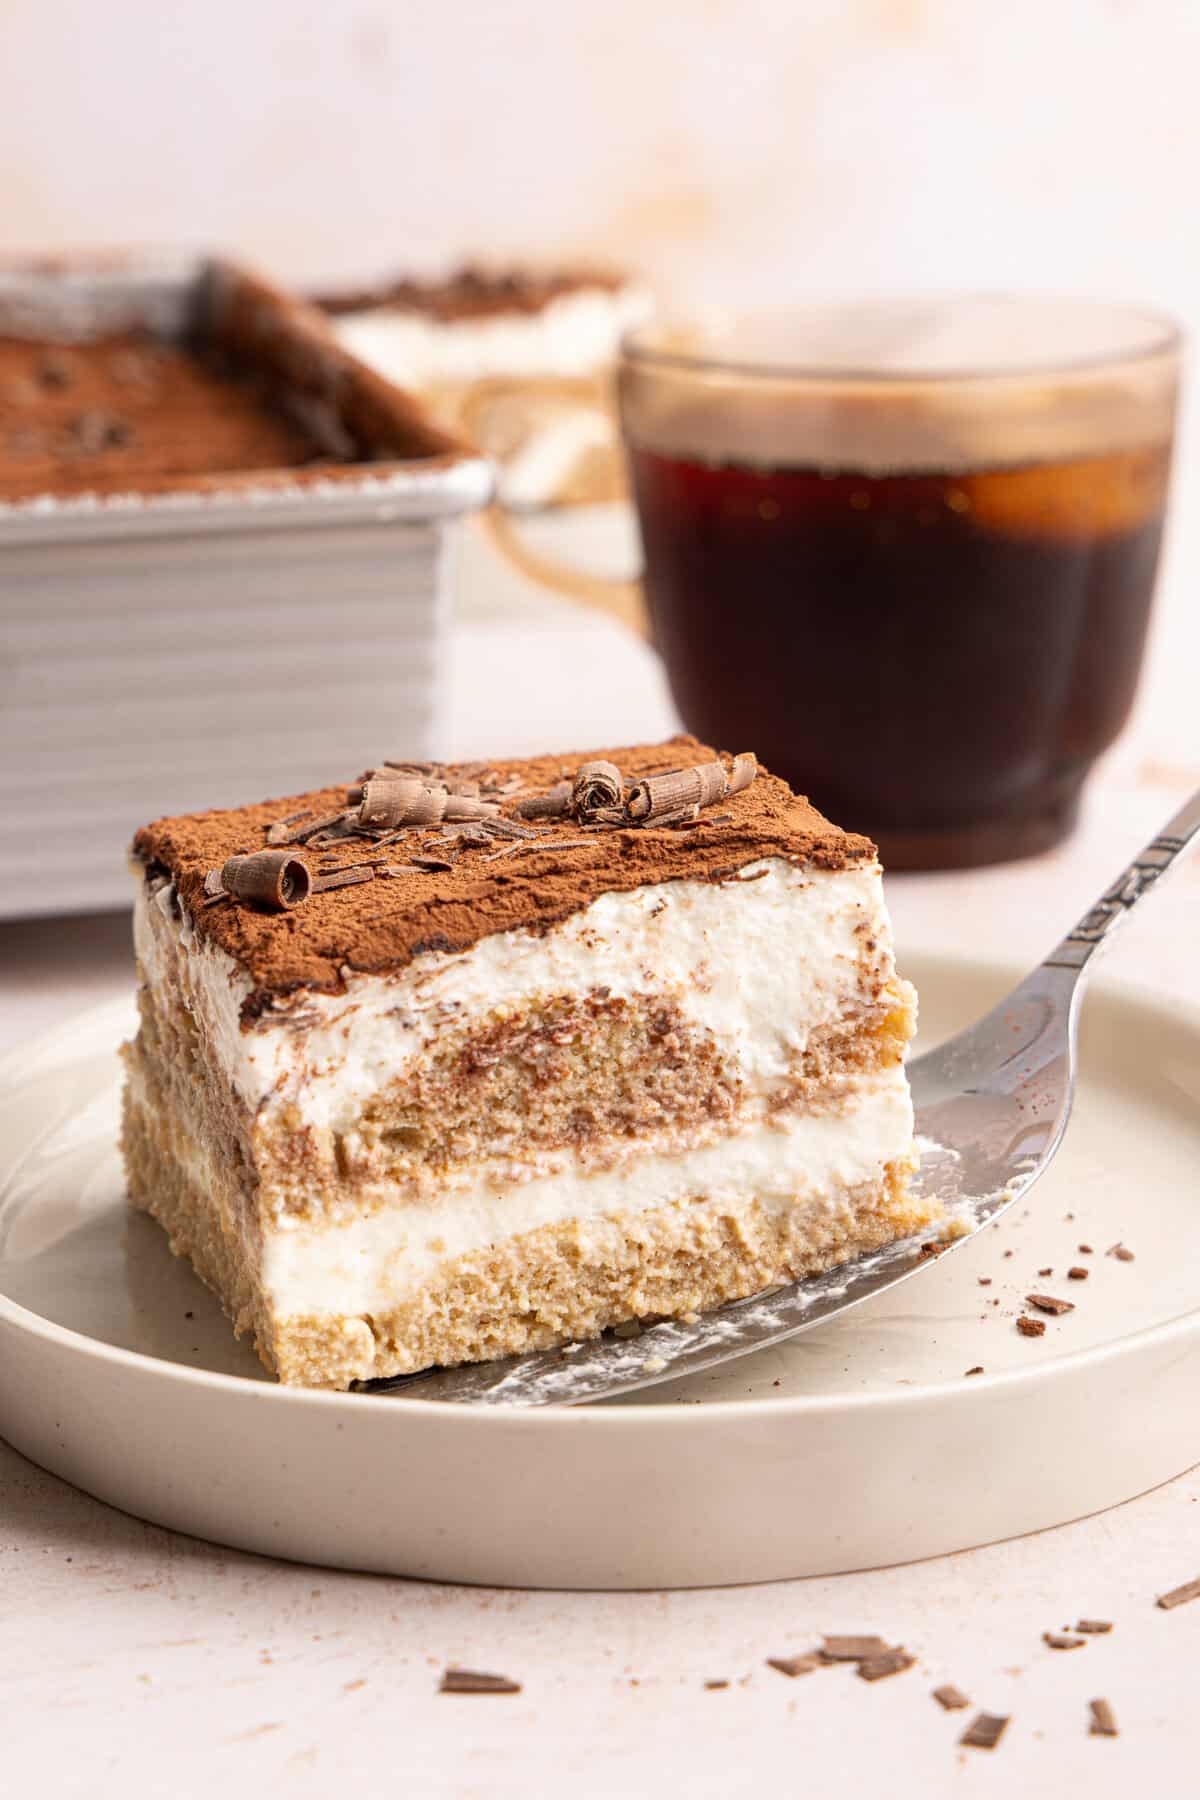
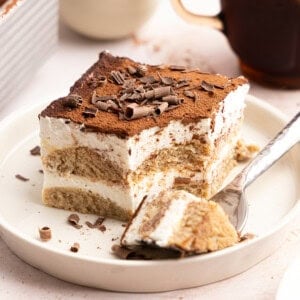
This gluten-free tiramisu is layered with coffee-soaked gluten-free ladyfingers and a fluffy whipped filling made with cottage cheese and whipped cream for a lighter twist on the classic dessert! It's rich with espresso flavor, completely no-bake, and easy enough to make ahead for holidays, dinner parties, or whenever you want a chilled dessert.
Quick Look: Gluten-Free Tiramisu
- ⏱️ Prep Time: 15 minutes
- 🍳 Cook Time: No cooking required!
- 🕒 Total Time: 15 minutes
- 👥 Servings: 9
- 📊 Calories: ~273 kcal per serving (based on nutrition panel)
- 👩🍳 Flavor Profile: all the rich flavors of classic tiramisu with a high protein filling, and gluten-free, coffee-soaked lady fingers
- ⭐ Difficulty: Easy no-bake dessert!
SUMMARIZE & SAVE THIS CONTENT ON
Why You'll Love Gluten-Free Tiramisu
This is the kind of dessert that looks impressive sitting on the table (just like my gluten-free strawberry angel cake trifle!) but secretly takes very little time or effort! The quick coffee soak gives the gluten-free ladyfingers plenty of rich espresso flavor without making them fall apart, which can be one of the trickiest parts of gluten-free tiramisu. After a few hours in the fridge, the layers soften just enough to slice cleanly while still holding their shape.
This easy tiramisu recipe is also a great make-ahead dessert. The whipped cottage cheese filling firms up as it chills, and the coffee flavor has time to soak deeper into every layer, so the texture and flavor are even better the next day! Plus, it adds a little protein to your dessert- who doesn't love that?!!
Ingredients You'll Need
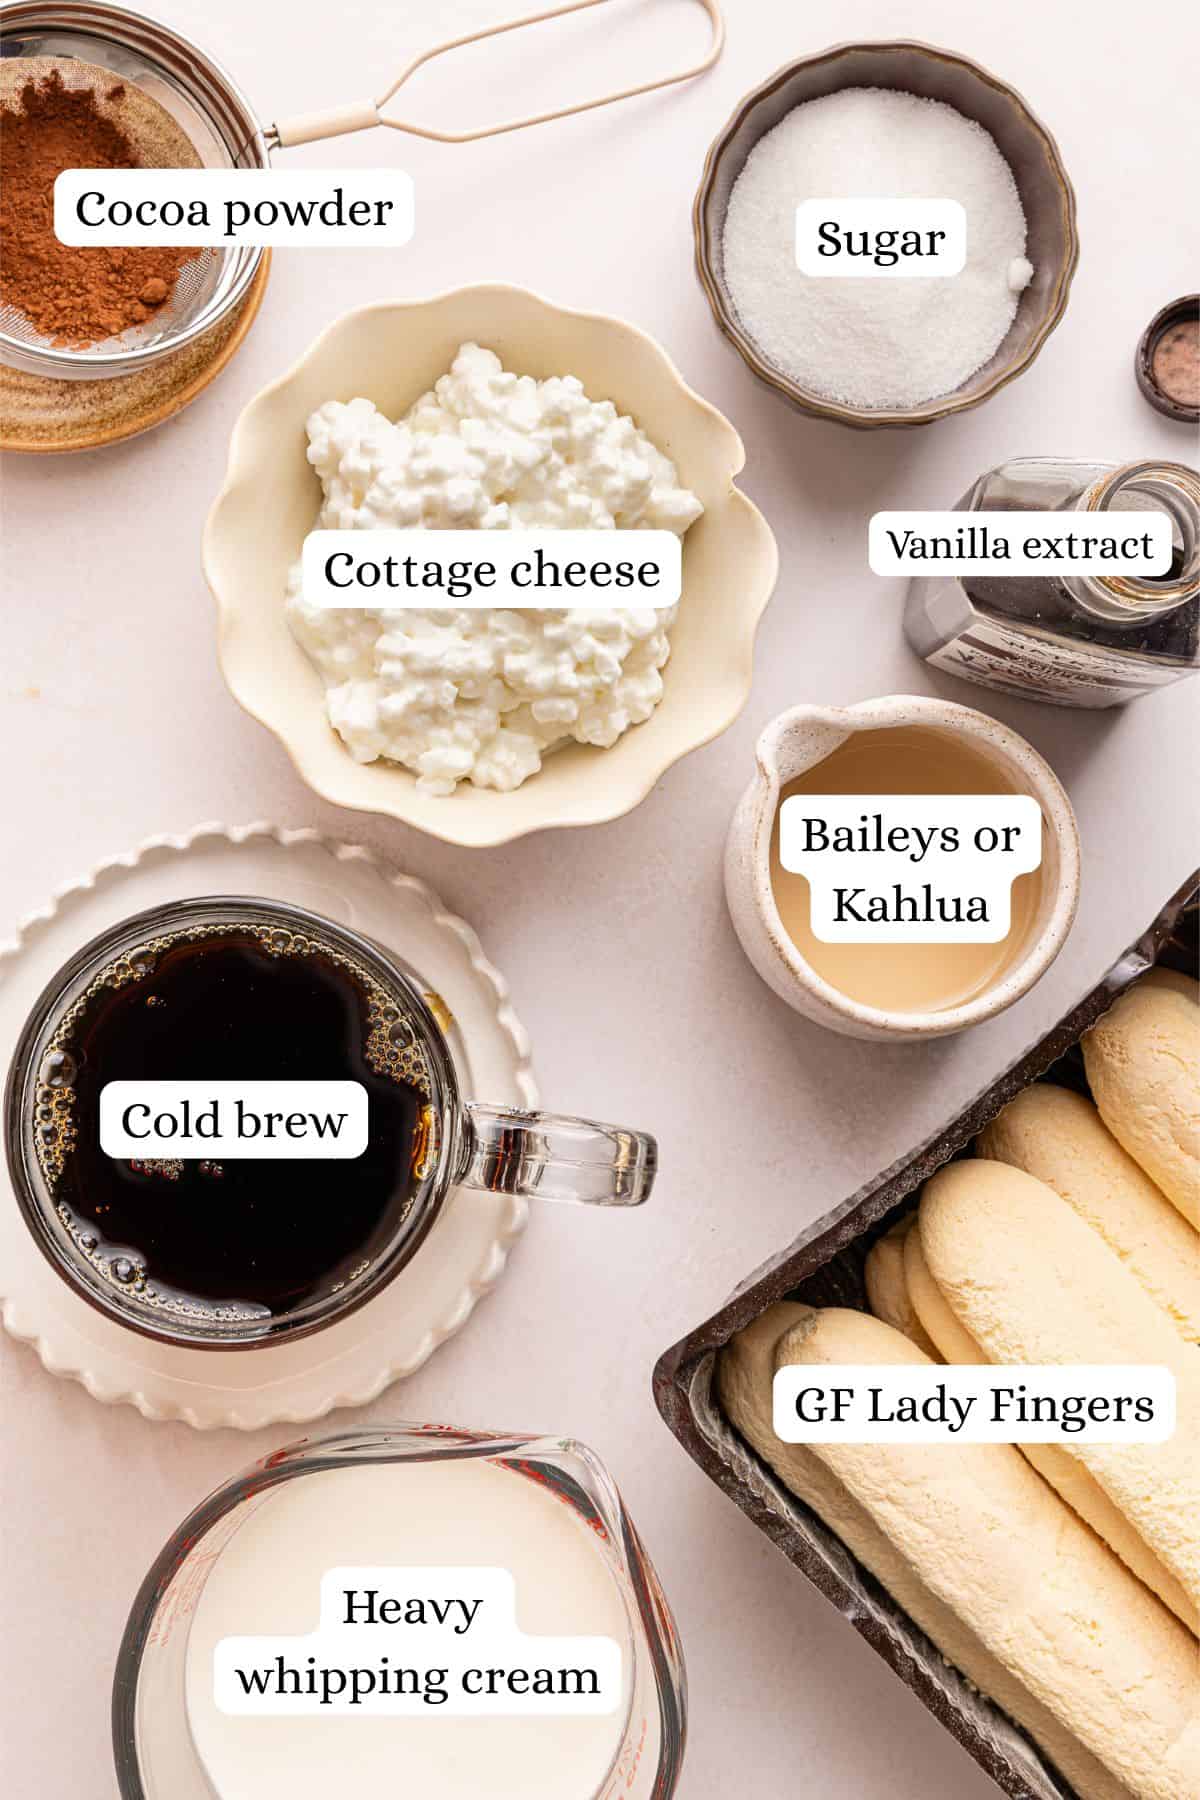
- Cocoa powder: A generous dusting on top adds that classic tiramisu finish.
- Heavy whipping cream: Whips into soft, airy peaks that give the filling its light texture.
- Cottage cheese: The secret to this high protein tiramisu recipe. It blends into a smooth, creamy filling while adding extra protein and keeping the dessert a little lighter! You can also use 8 oz of marscarpone cheese, if preferred.
- Granulated sugar: Sweetens the filling just enough without overpowering the coffee flavor.
- Vanilla extract: Softens the tanginess from the cottage cheese and rounds everything out.
- Strong cold brew coffee: Gives the ladyfingers that signature tiramisu flavor. I like the Stok brand, but espresso works too if you want a bolder coffee flavor.
- Kahlua: Adds warmth and depth to the coffee mixture. You can also use Bailey’s Irish Cream for a fun twist! Omit for an alcohol-free version and replace it with more cold brew.
- Schar Gluten Free Ladyfingers: These absorb the coffee mixture quickly, so a fast dip is all you need!
Recipe Variations
- Skip the Kahlua and use extra cold brew or espresso for an alcohol-free gluten-free tiramisu recipe.
- Espresso gives it a stronger coffee flavor that tastes a little more like classic tiramisu.
- If your cottage cheese feels thick straight from the container, blending it with a splash of water helps it whip up smoother.
If you love creamy no-bake desserts with a tangy finish, these key lime cheesecake bars are another great make-ahead option!
How to Make Gluten-Free Tiramisu
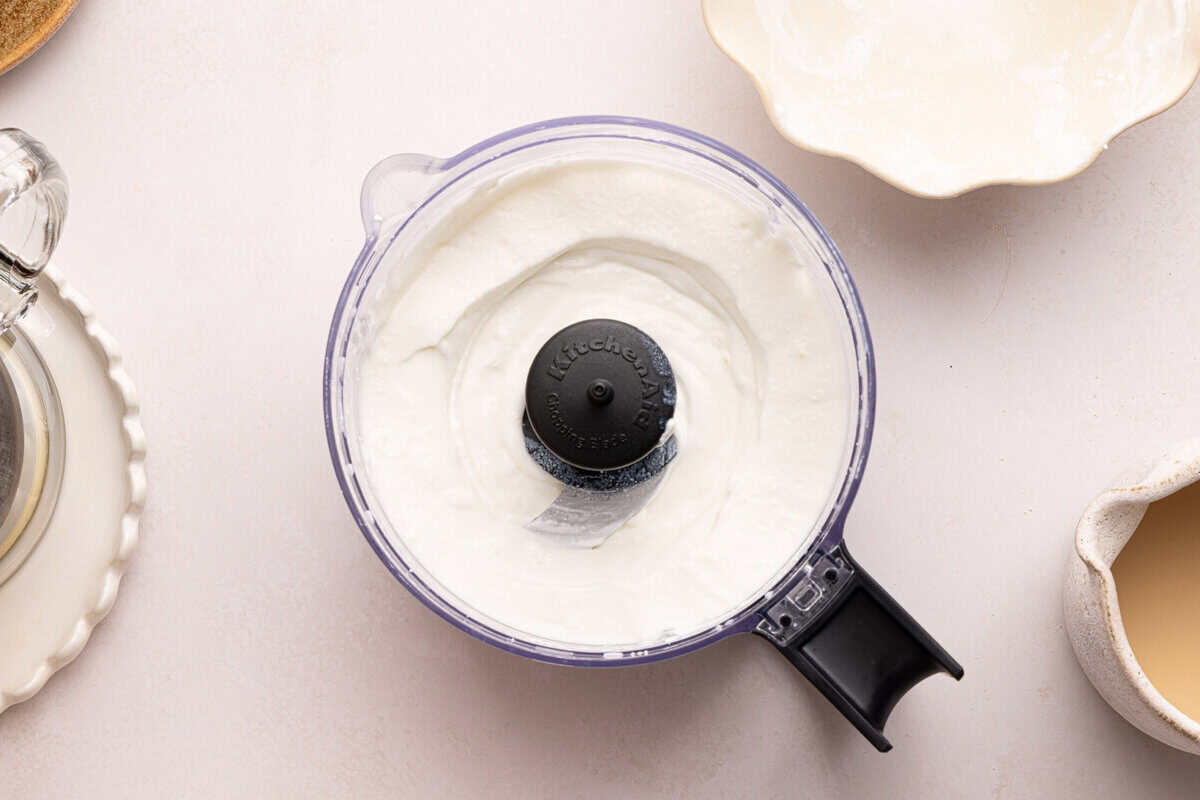
Step 1: Whip your cottage cheese with 1-2 tbsp water if needed until smooth and creamy, then set aside. You want the texture silky and spreadable with no visible curds left behind.
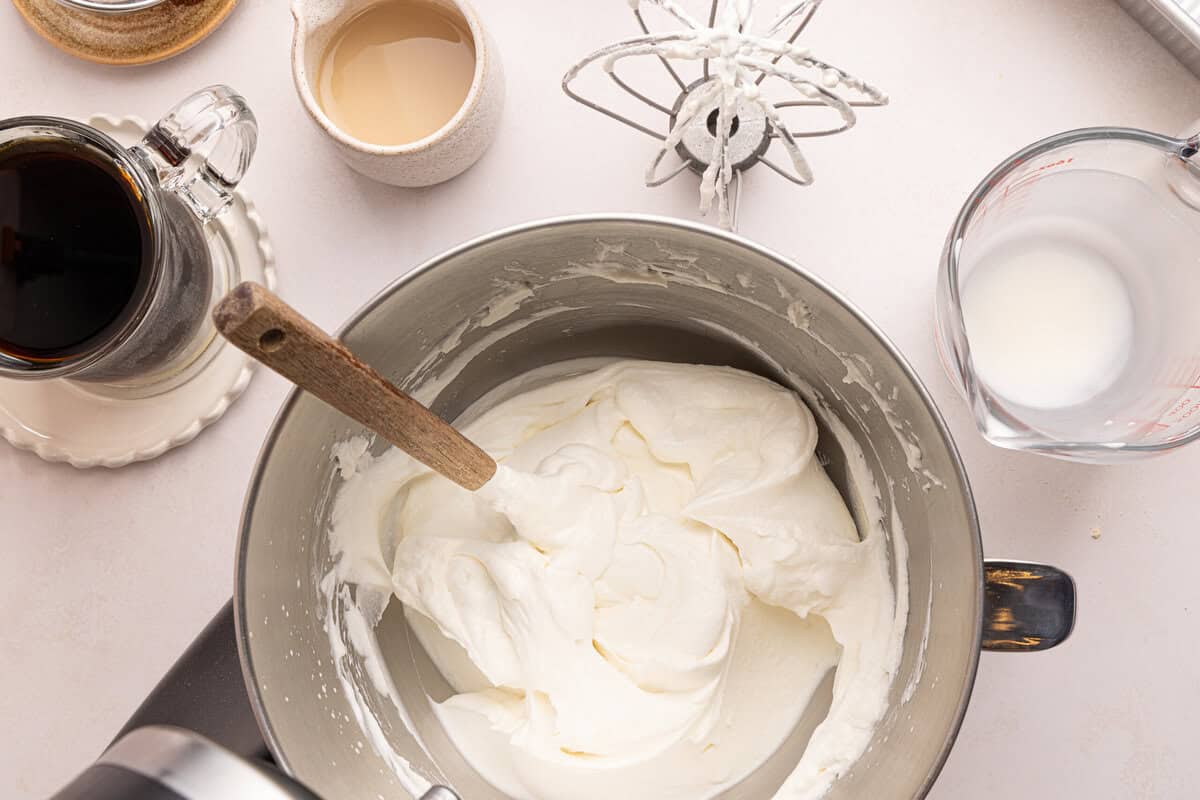
Step 2: Add the heavy whipping cream to a chilled metal bowl and beat on medium high speed with an electric hand mixer, or use a stand mixer if you have one. When soft peaks start to form, add the sugar and vanilla. Gently fold in the whipped cottage cheese using a spatula until smooth and fully combined. Try not to overmix here so the filling keeps its airy texture.
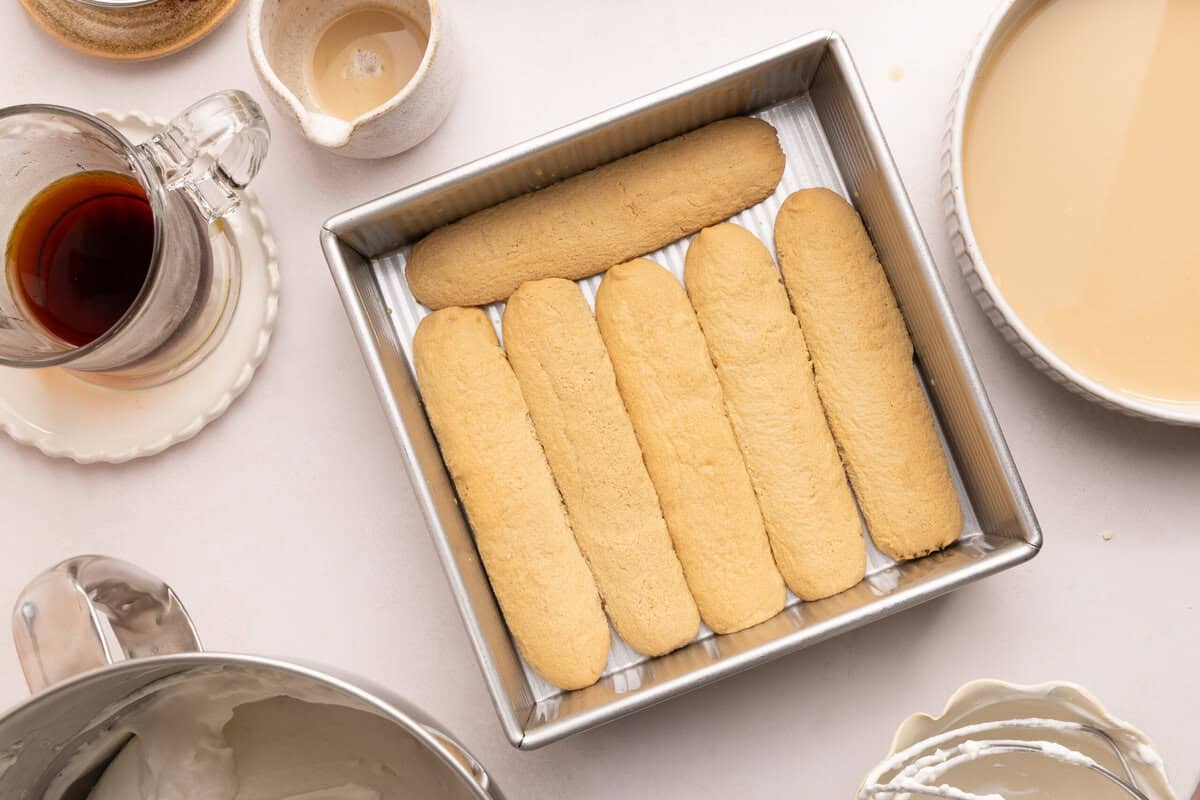
Step 3: Add the cold brew and Kahlua or Baileys to a shallow bowl big enough to fit the ladyfingers. Dip 6 of the ladyfingers into the mixture. Don't soak them, just quickly dip on both sides or they will start to fall apart. Arrange them in the bottom of an 8×8 baking dish to form the first layer.

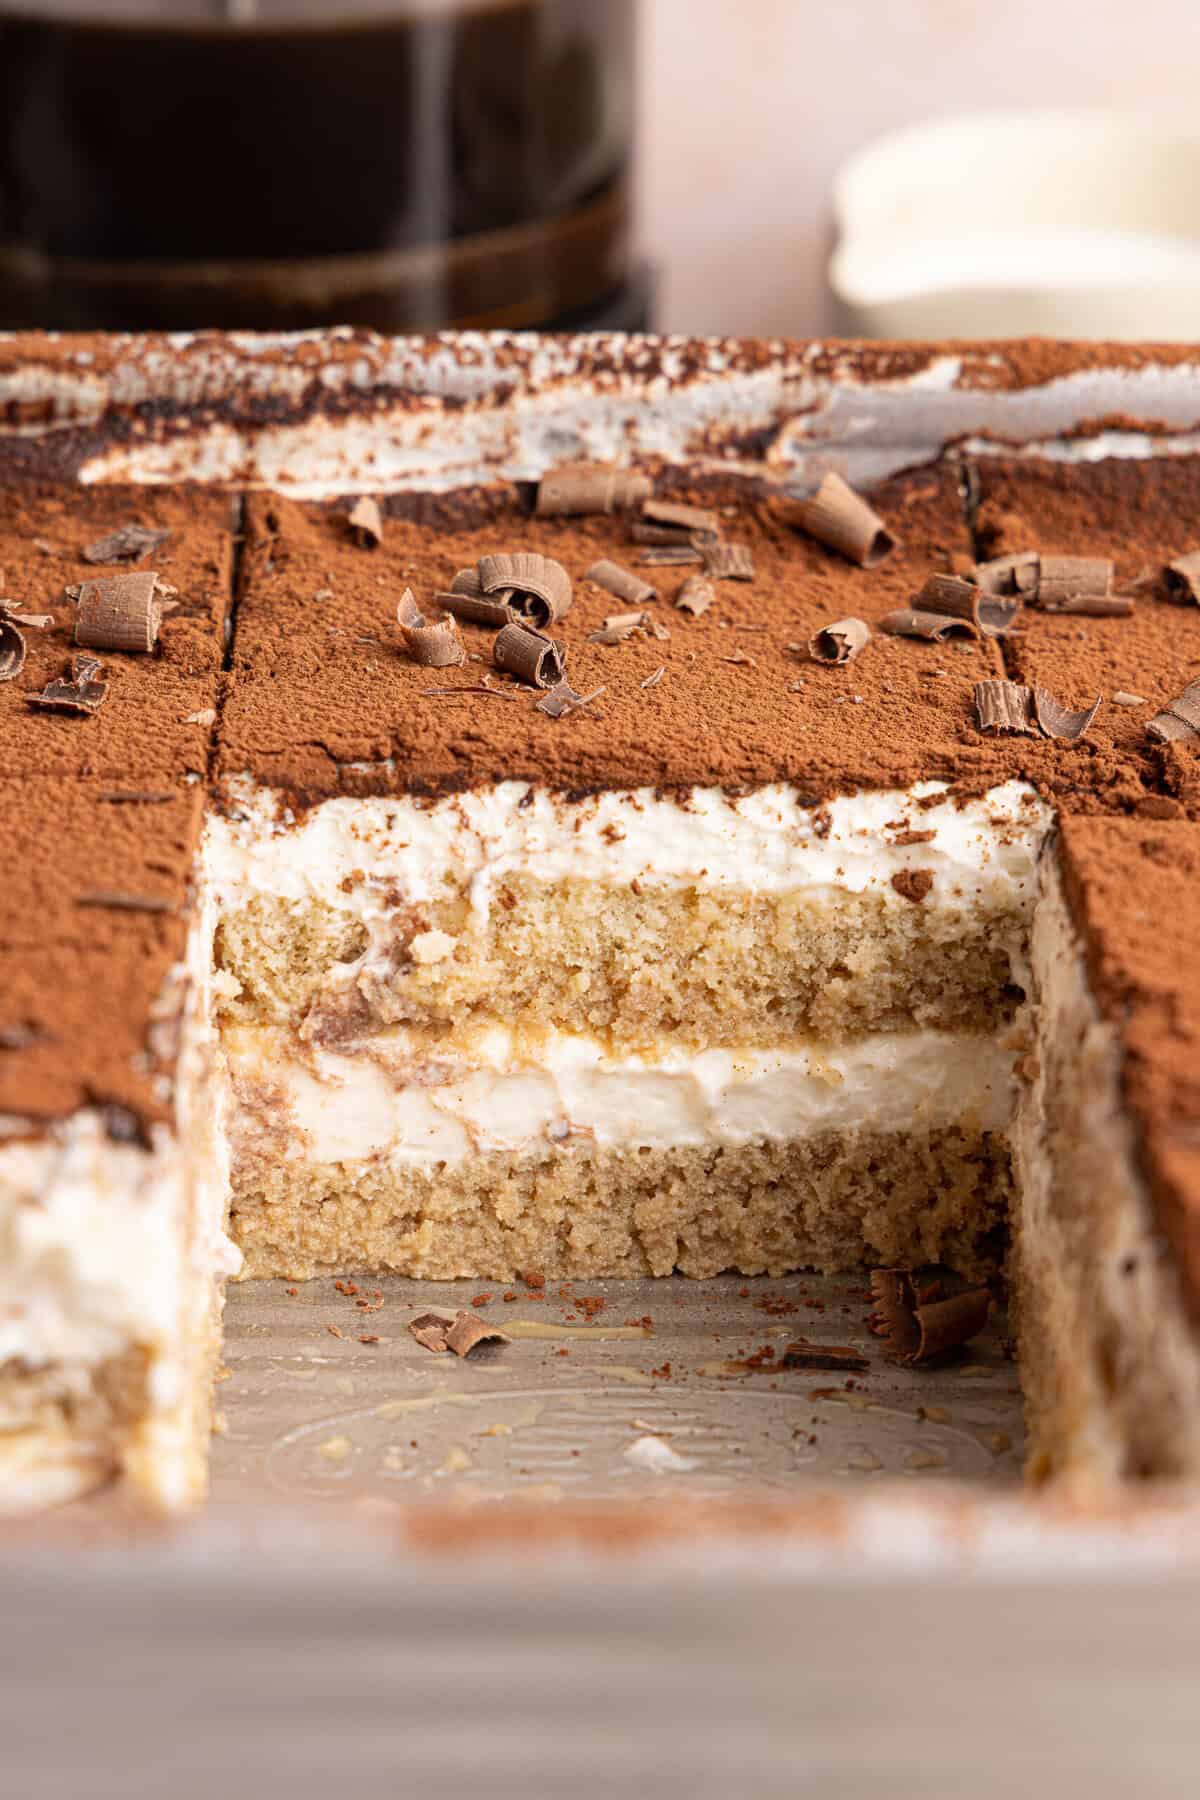
Step 4: Add half of the whipped cream mixture on top of the ladyfingers and smooth it out with a spatula. The filling will naturally spread into the gaps between the ladyfingers.
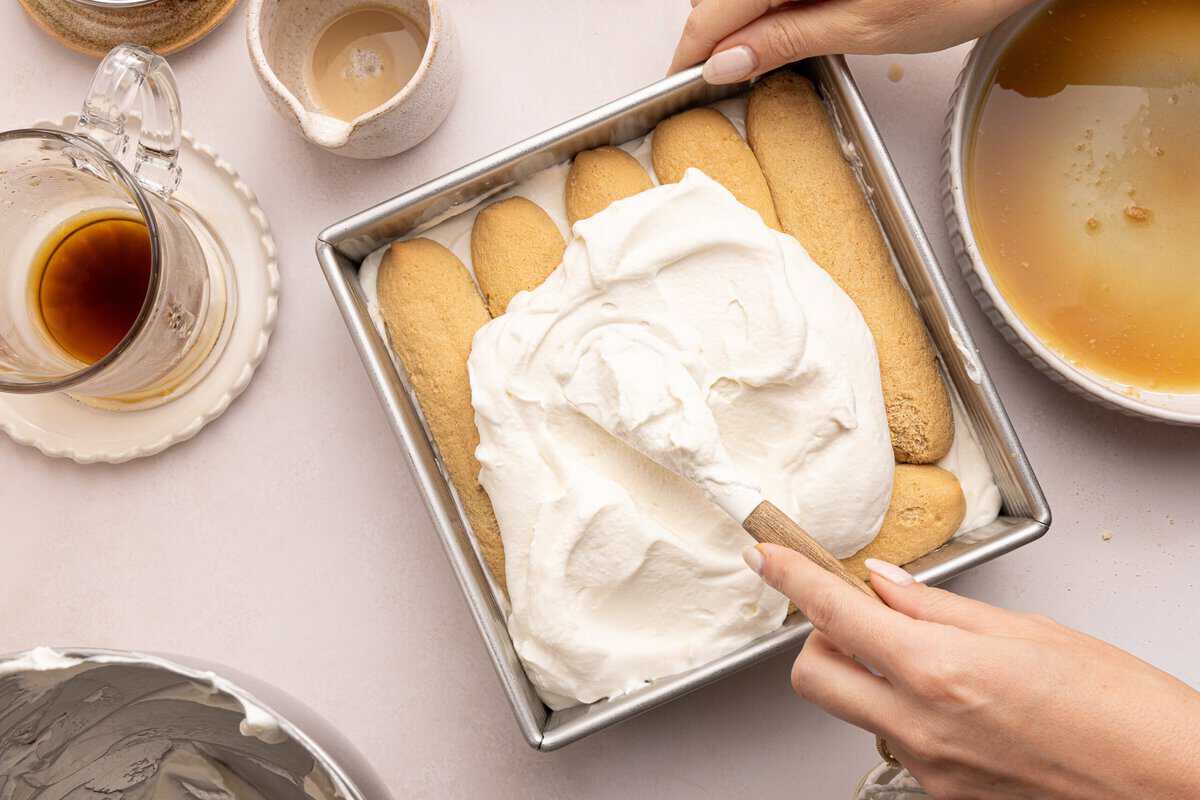
Step 5: Repeat with the remaining 6 ladyfingers, placing them on top of the whipped cream layer, then spread the remaining cream mixture evenly over the top.
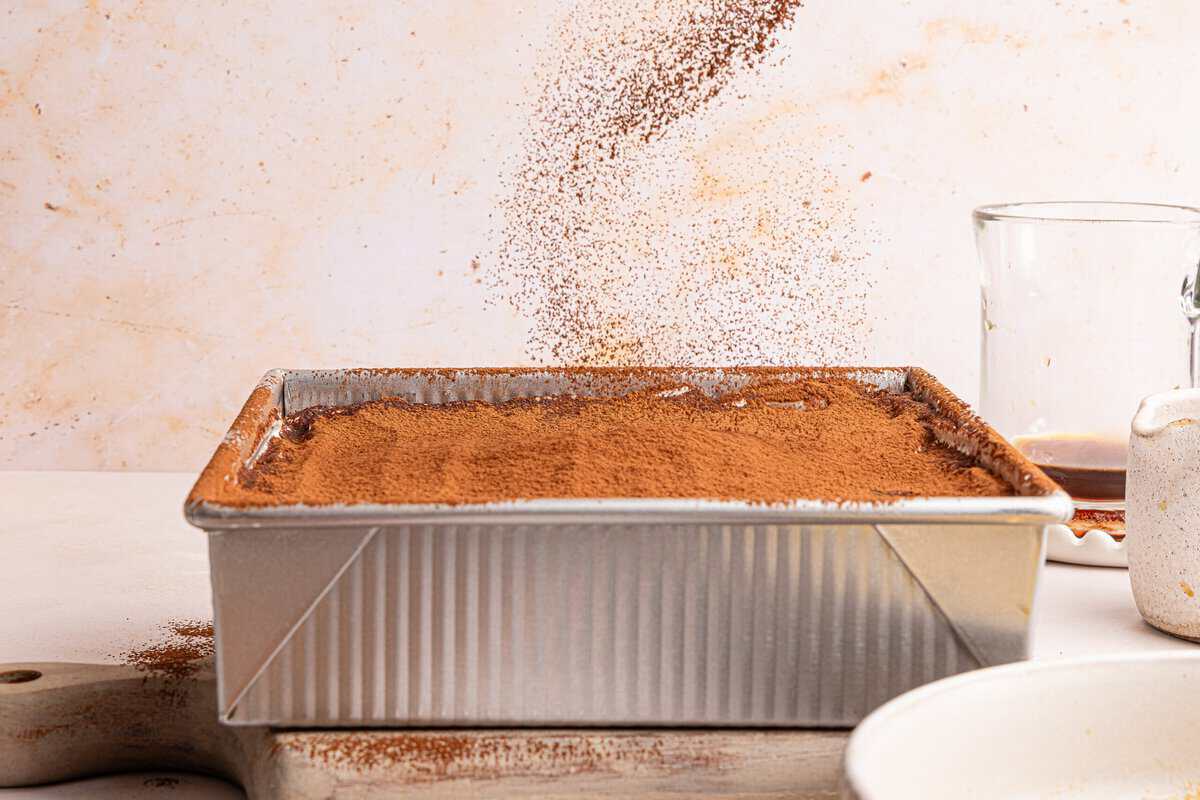
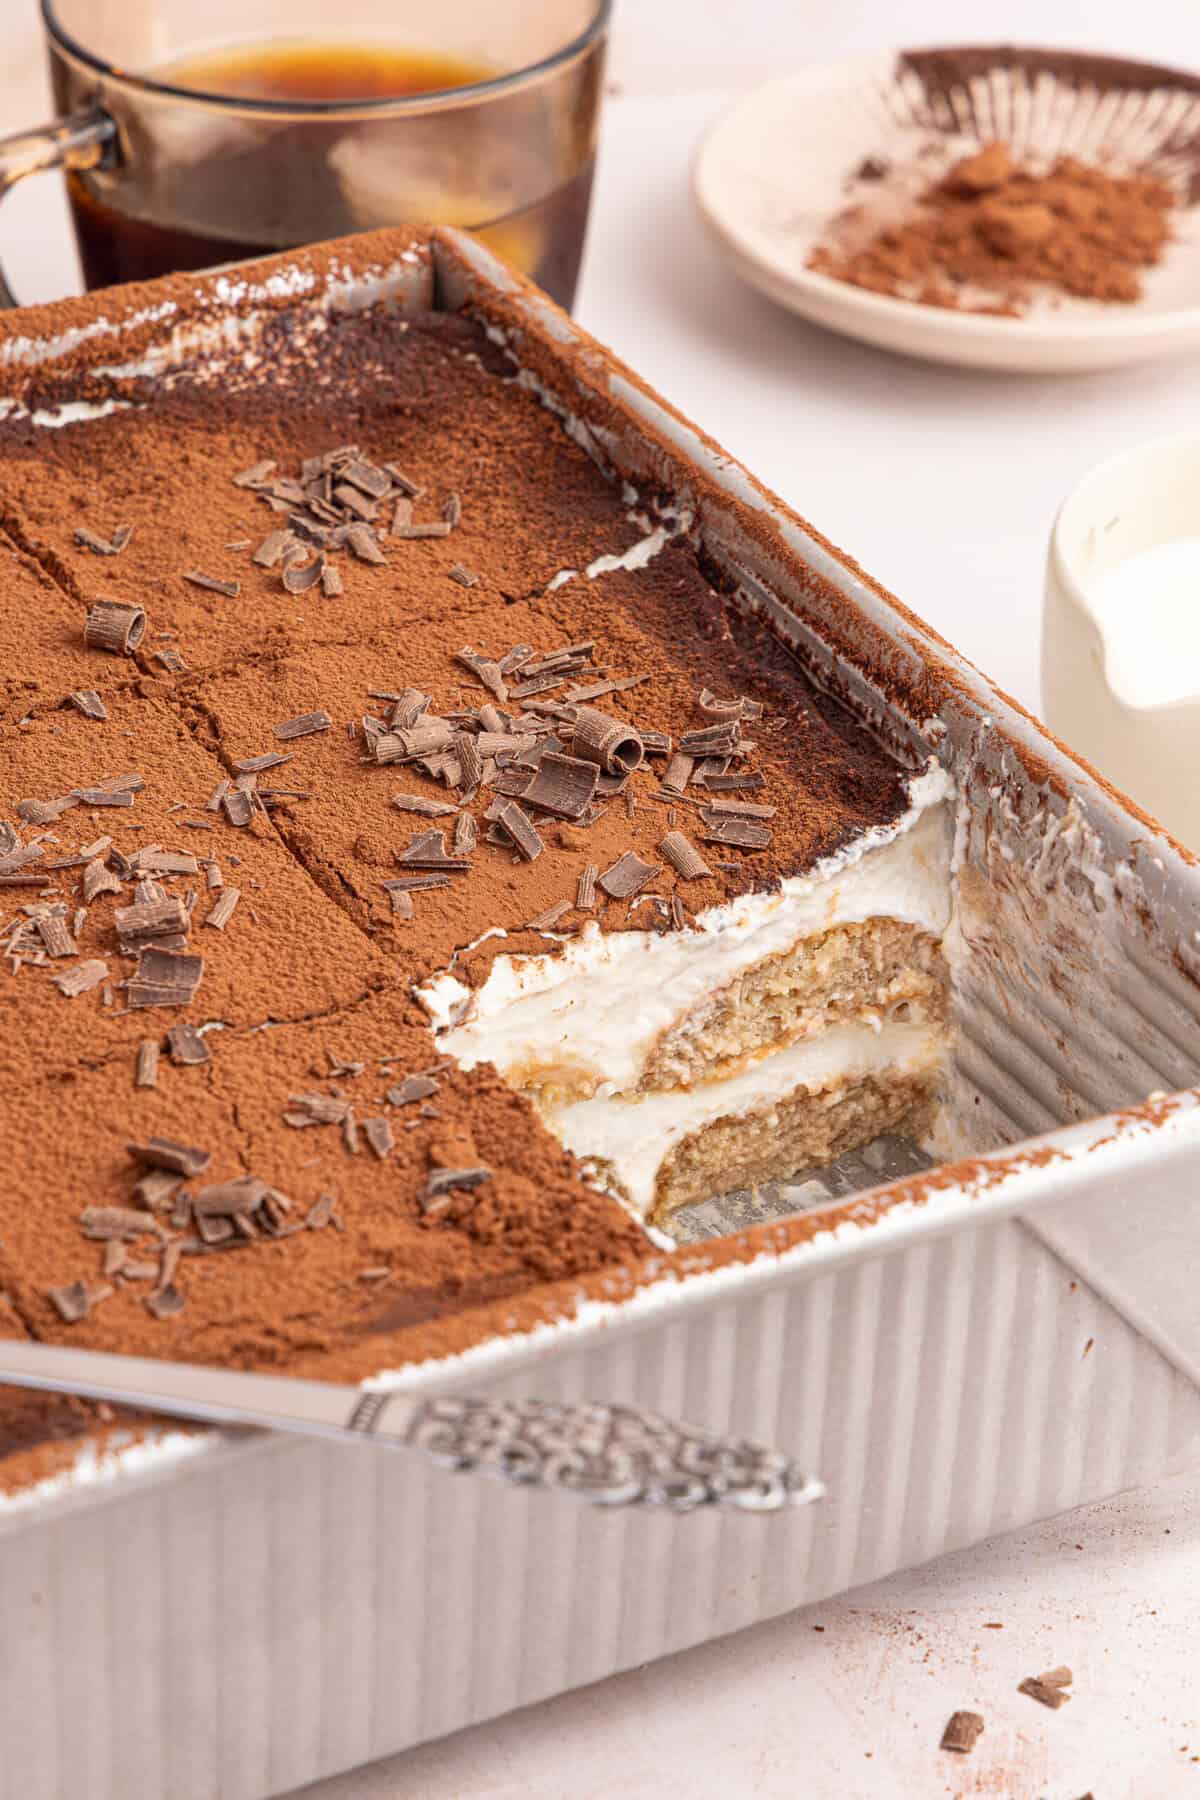
Step 6: Dust a hefty amount of cocoa powder on top using a sifter or fine mesh strainer. Refrigerate for a few hours or overnight. As it chills, the gluten-free ladyfingers soften and absorb the coffee mixture for that classic tiramisu texture. Slice into 9 pieces, serve cold, and enjoy!
Expert Tips
- Chill your bowl BEFORE whipping the cream. Cold cream whips faster and holds its shape better!
- Don't let the gluten-free ladyfingers sit for a long time in the coffee mixture. A quick dip is enough. They soften much faster than traditional savoiardi.
- Blend the cottage cheese until completely smooth. This is what keeps the filling silky instead of grainy.
- Overnight chilling gives this recipe the best texture. The layers soften and settle together, which makes each slice easier to cut cleanly.
- Use a fine mesh strainer for the cocoa powder so the top layer looks soft and even instead of clumpy.
Tiramisu isn't the only no-bake dessert I keep on repeat! These no-bake strawberry cheesecake bars are perfect for warmer months, and these creamy no-bake pumpkin cheesecake bars are one of my favorite holiday desserts.
Storage & Make-Ahead Tips
- If you're making this for a party or get-together, assembling it the night before works really well. Wait to dust the cocoa powder on top until closer to serving so the cocoa powder looks fresh and doesn't darken in the fridge.
- Store the tiramisu covered in the fridge for up to 4 days. The layers soften even more as it sits in the fridge, which is part of what makes tiramisu so good the next day.
Recipe FAQs
It's perfect for making ahead of time! This dessert actually tastes better after chilling for several hours because the ladyfingers have time to soften and absorb the coffee mixture.
Not really! Once blended and folded into the whipped cream, the cottage cheese becomes mild and creamy. The coffee, cocoa, and vanilla flavors stand out most. You can also use marscarpone cheese for a more traditional taste, if preferred!
Yes. Freeze it tightly covered for up to 1 month. Thaw overnight in the refrigerator before serving. The texture softens slightly after freezing but still tastes great chilled.
Yes – You can use dairy free whipping cream and 8 oz Kite Hill cream cheese instead of the regular whipping cream and cottage cheese!
More Gluten-Free Dessert Recipes


Easy Gluten-Free Tiramisu Recipe
Equipment
- 8×8 baking dish
Ingredients
- 1 ½ cups heavy whipping cream
- 8 oz cottage cheese, blended until smooth. Add 1-2 tbsp water if needed before blending.
- ⅓ cup granulated sugar
- 1.5 tsp vanilla extract
- 1 ¾ cups strong cold brew coffee, store-bought is fine, I like Stok brand. Can also use espresso.
- ⅓ cup kahlua, or Bailey's Irish Cream for a fun twist. Omit for alcohol-free and replace with more cold brew.
- 1 package Schar Gluten Free Lady Fingers
- Cocoa powder , for dusting the top
Instructions
- Whip your cottage cheese (with 1-2 tbsp water if needed) and set aside.
- Add the heavy whipping cream to a chilled metal bowl and beat on medium high speed with an electric hand mixer (or use a stand mixer if you have one). Add the sugar and vanilla when it is almost done and beat until it's a fluffy whipped cream texture with stiff peaks. Gently fold in the whipped cottage cheese using a spatula until combined and smooth. Set aside.
- Add the cold brew and kahlua to a shallow bowl big enough to fit the lady fingers. Dip 6 of the lady fingers into the mixture (don't soak, just quickly dip on both sides or they will fall apart) and add each one to the bottom of an 8×8 baking dish to form the bottom layer.
- Add half of the whipped cream mixture on top of the lady fingers and smooth out with a spatula.
- Repeat with the remaining 6 lady fingers, place them on top of the whipped cream, and then add the remaining cream mixture on top and smooth out.
- Dust a hefty amount of cacao powder on top (you can use a sifter or a fine mesh strainer).
- Refrigerate for a few hours, up to overnight. Slice into 9 pieces, and enjoy!
Notes
- Chill your bowl BEFORE whipping the cream. Cold cream whips faster and holds its shape better!
- Don't let the gluten-free ladyfingers sit for a long time in the coffee mixture. A quick dip is enough. They soften much faster than traditional savoiardi.
- Blend the cottage cheese until completely smooth. This is what keeps the filling silky instead of grainy.
- You can sub 8 oz marscarpone cheese for the cottage cheese if you prefer a more traditional taste.
- For dairy free, use dairy free whipping cream and 8 oz Kite Hill cream cheese.
- Overnight chilling gives this recipe the best texture. The layers soften and settle together, which makes each slice easier to cut cleanly.
- Use a fine mesh strainer for the cocoa powder so the top layer looks soft and even instead of clumpy.
- Store the tiramisu covered in the fridge for up to 4 days. The layers soften even more as it sits in the fridge, which is part of what makes tiramisu so good the next day.
- If you're making this for a party or get-together, assembling it the night before works really well. Wait to dust the cocoa powder on top until closer to serving so the cocoa powder looks fresh and doesn't darken in the fridge.
Nutrition
All nutrition facts are an estimate and automatically calculated. While I fact check them using My Fitness Pal, please note that they may not always be 100% accurate and depend on ingredients used. Weigh your total and divide by the number of servings for the most accurate grams per serving size.


