
This post may contain affiliate links. Please read our disclosure policy.
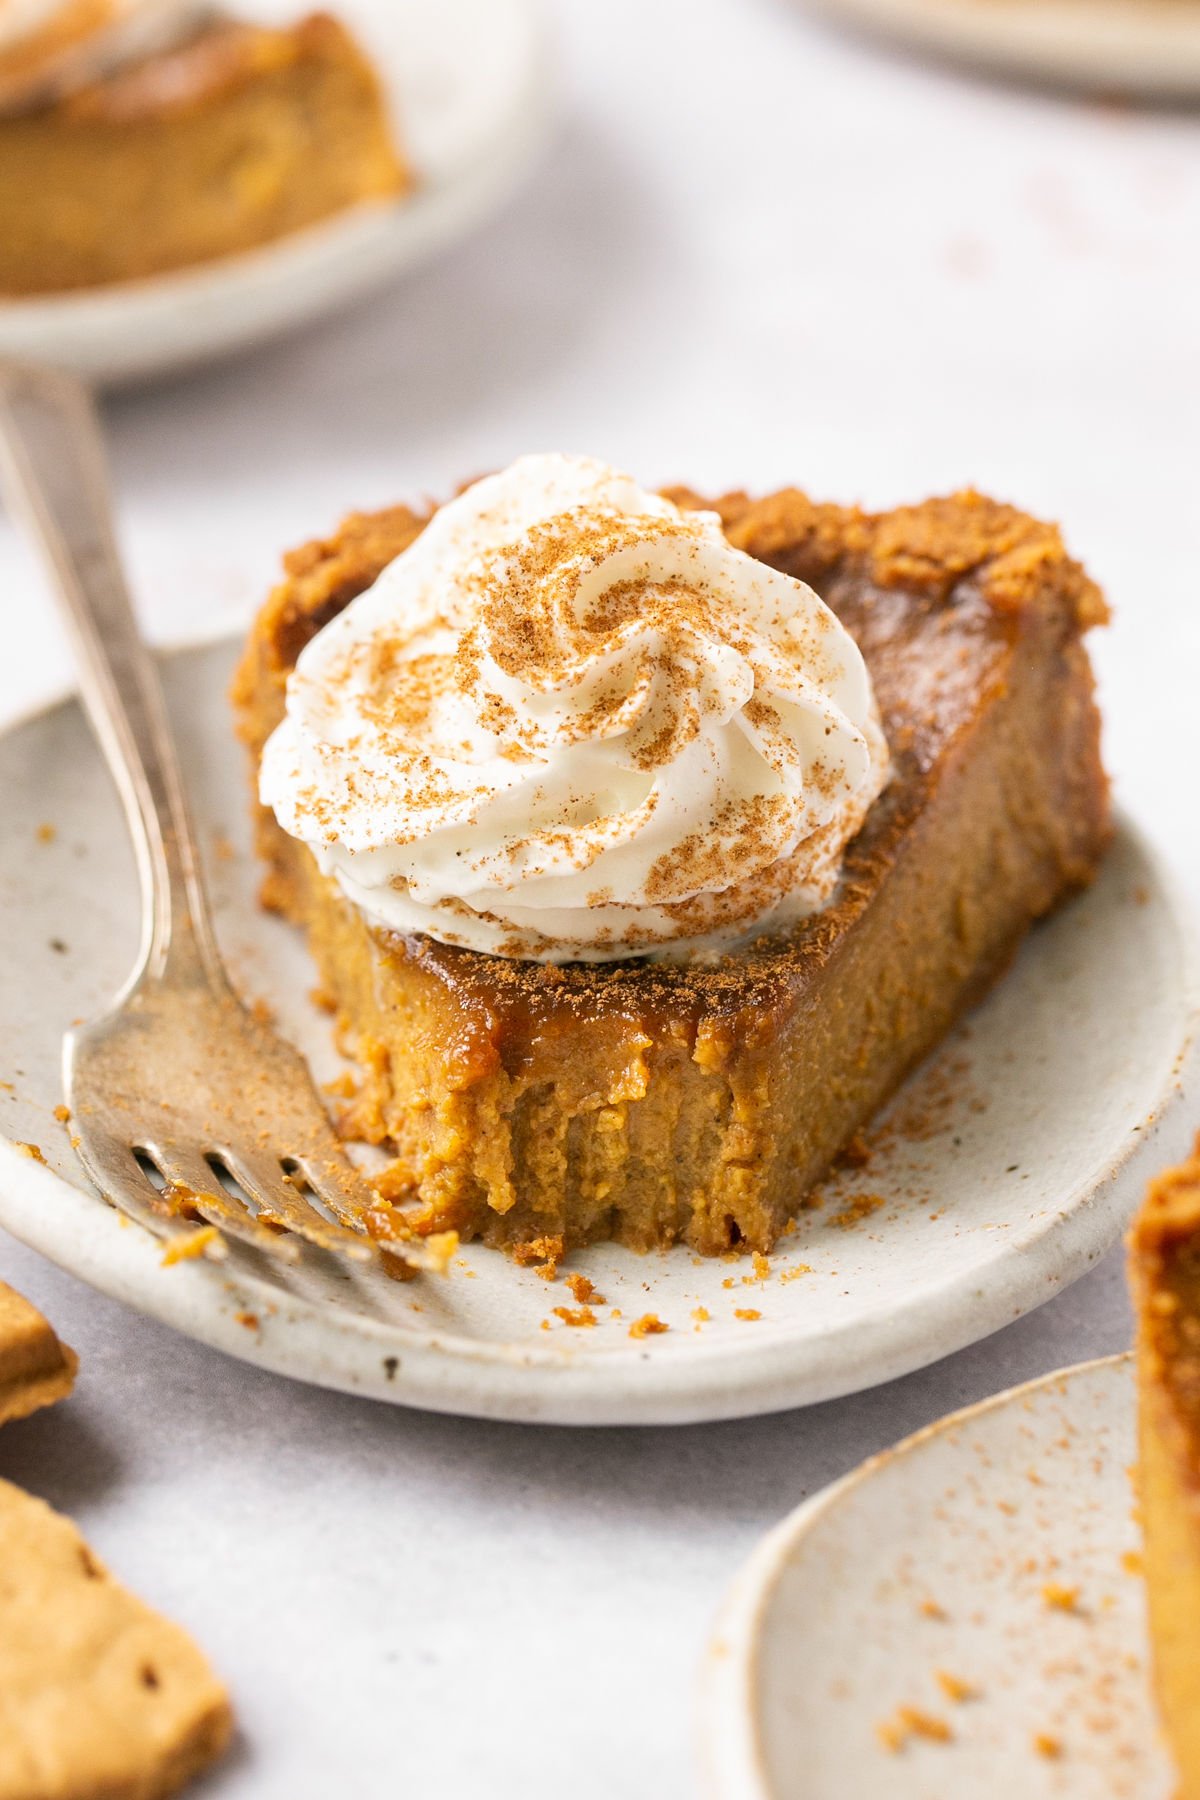
Creamy, smooth pumpkin pie filling with a sweet, crunchy gluten free pie crust makes for the ultimate seasonal treat! Perfect for Fall gatherings and holidays, this easy Pumpkin Pie recipe with Graham Cracker Crust is delicious, flavorful, and loved by all!
What Makes This Recipe Great
Fall is full of gatherings, friends and family, changing leaves, sweater weather, and let’s not forget- good food! Everyone needs a go-to pumpkin pie recipe, and for my gluten-free friends, this one is divine! It is the perfect dessert to bring to this year’s Thanksgiving dinner. It’s also the easiest pumpkin pie recipe ever.
This recipe will be gobbled up in no time, featuring a classic, delicious pumpkin pie filling and a homemade graham cracker crust (made from gluten-free graham crackers!). You may even want to make two or three because I’m telling you- it’s incredible!
My creamy pumpkin pie with buttery graham cracker crust takes only 10 minutes to prep, comes with a dairy-free option, and, of course, is gluten-free! Of all the pumpkin desserts on my site, this is hands-down my favorite. The easy graham cracker crust gives it a fun twist compared to traditional pie crust, and in my opinion, way more flavor!
Ingredient Notes
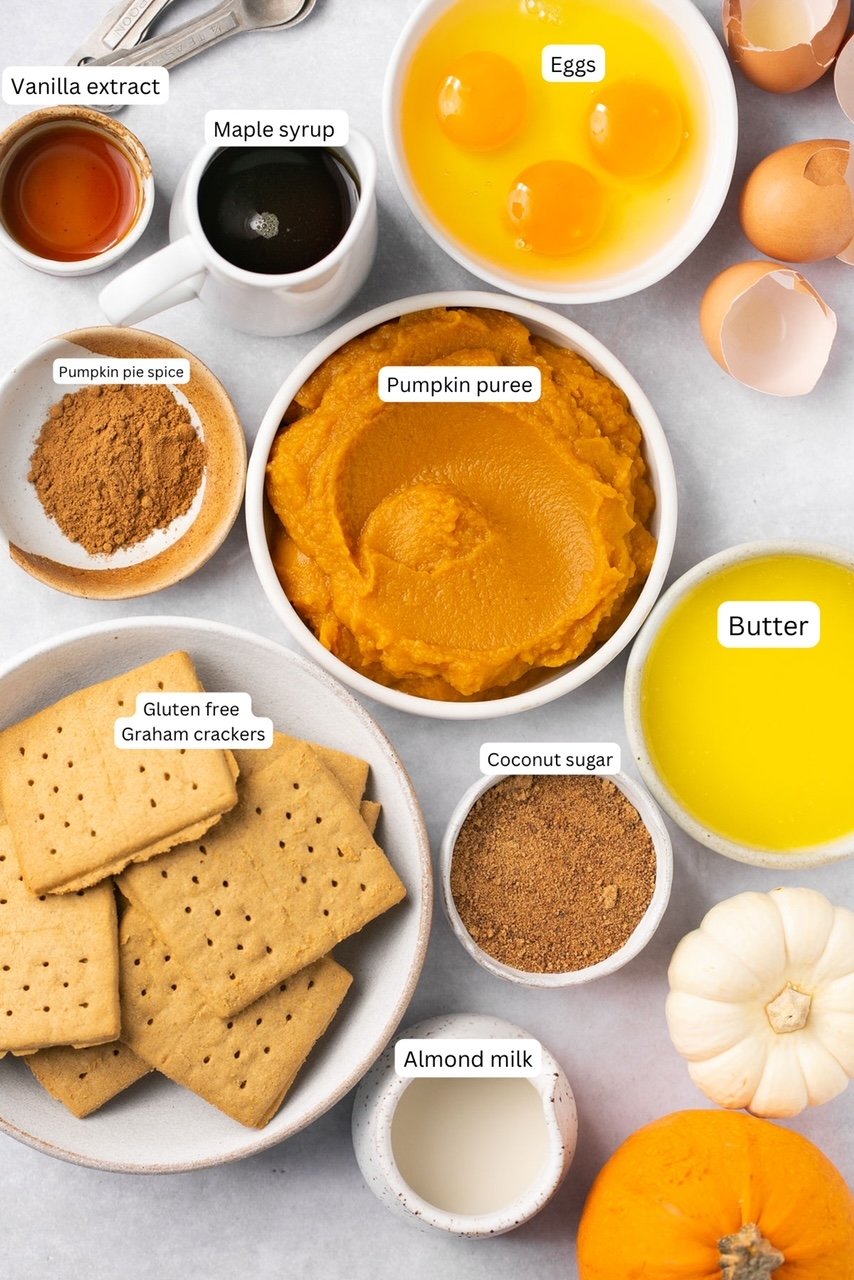
Gluten Free Graham Crackers: I used slightly less than a complete package of Pamela’s brand gluten free graham crackers. Any brand works!
Butter: If you want the dairy-free option, use vegan butter if desired. Otherwise, you can use regular butter.
Pumpkin Puree: Use a can of pure pumpkin puree, not pumpkin pie filling. There’s a ton of added sugar in the canned pie filling!
Pumpkin Spice: If you don’t have pumpkin pie spice on hand and want to make your own, Simply combine 2 tsp ground cinnamon, 1 tsp ground ginger, 1 tsp ground nutmeg, ¾ tsp ground cloves, and ¾ tsp allspice. Then use the 1tbsp + 1tsp and save the rest for another recipe.
Almond Milk: I haven’t tried this recipe with alternative milk options, but any non-dairy milk should work. You could also use regular milk- I recommend 2% or whole milk.
Recipe Highlights
- Simple Ingredients
- 10-Minute Prep
- Classic, delicious seasonal flavors
- Gluten-Free with Dairy-Free option
- Kid-Friendly
- Perfect for the holiday season & Gatherings!
Recipe Step by Step
Graham Cracker Crust Recipe
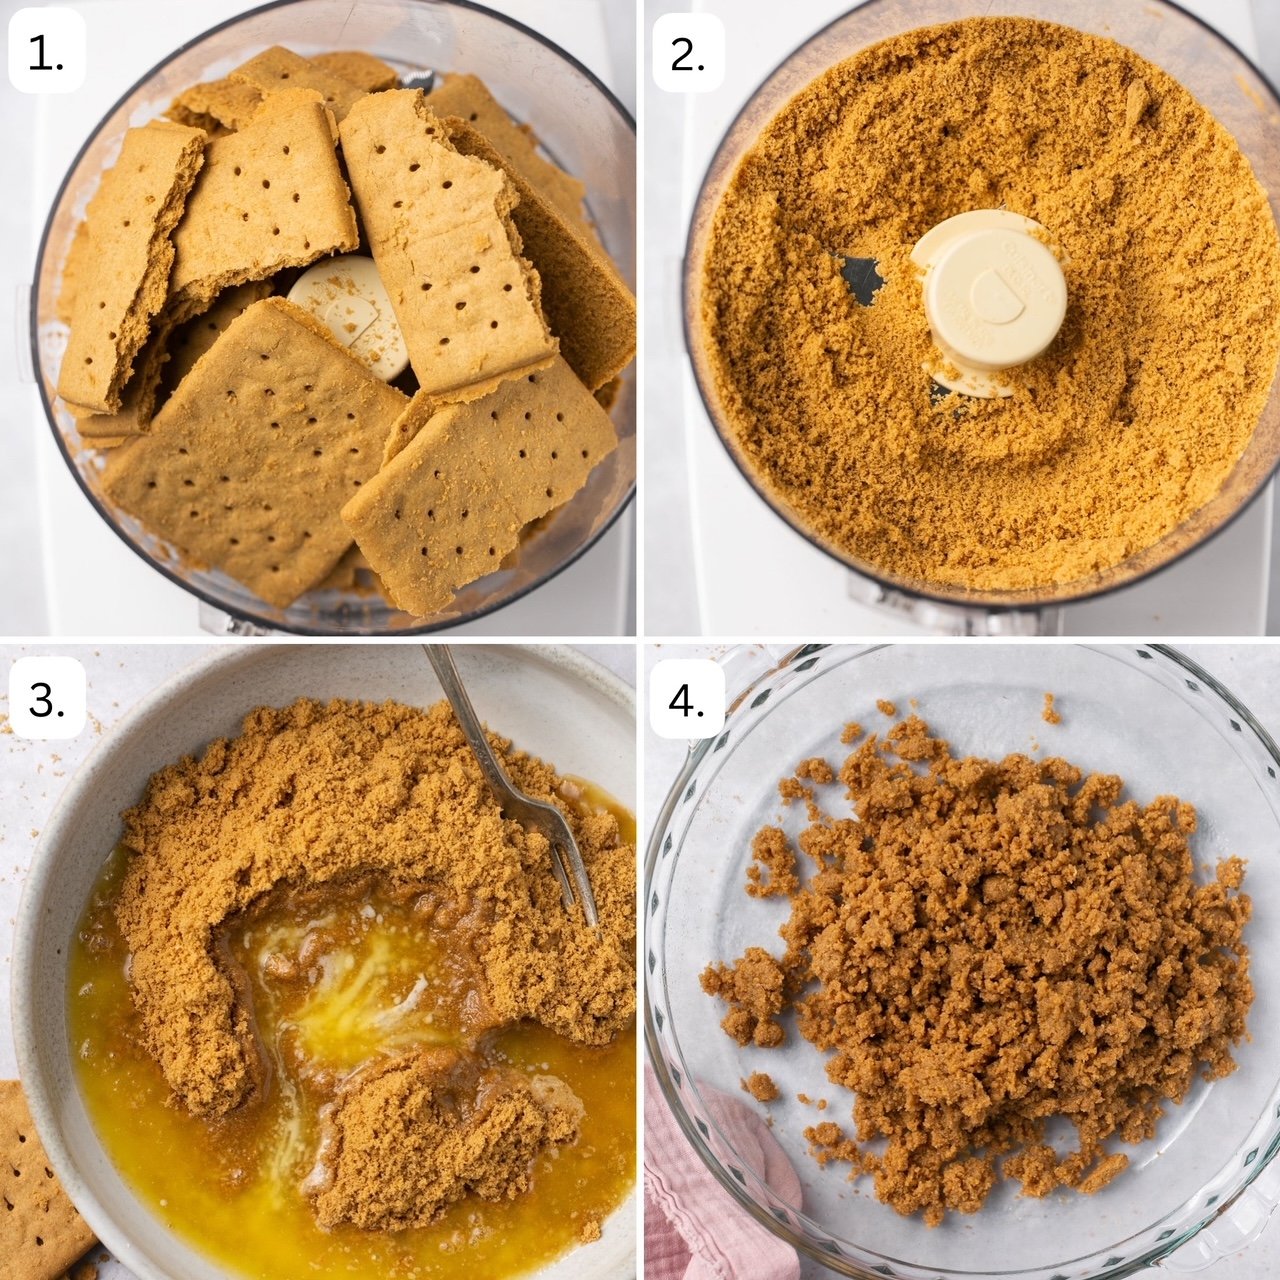
- Use a food processor to pulse the gluten free graham crackers until they turn into fine crumbs and resemble a sand texture.
- Measure out exactly 1.5 cups of the graham cracker crumbs and add them to a bowl.
- Add the melted butter and use a fork to mix until well combined.
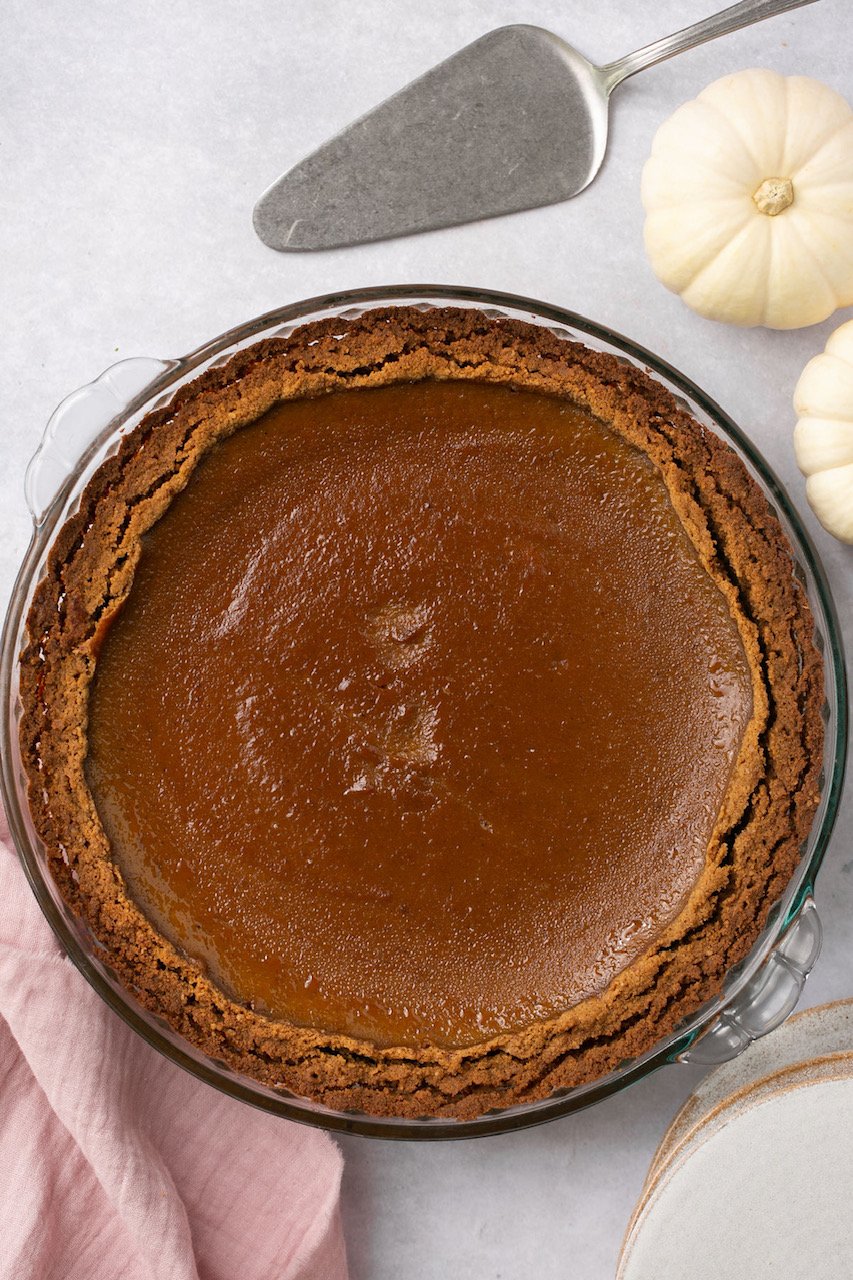
- Lightly spray a 9-inch pie pan with cooking spray. Use your fingers to press the graham cracker mixture into the bottom of the pie pan and up the sides to form a crust. Use the bottom of a measuring cup to help flatten the crust evenly. Place the graham cracker pie crust in the fridge while you make the filling.
Gluten Free Graham Cracker Crust Tips
Binding: Use a measuring cup to help flatten the crust evenly. Press the gluten free graham crackers mixture firmly into your pie plate, making sure to leave no gaps. Build up the sides, firmly pressing on the walls of the pie dish.
Chilling: There is no need to bake your gluten free pie crust before adding the filling. Simply place your finished pie crust in the refrigerator while you make the filling. This will help bind the gluten free graham cracker crust together.
Baking: If you notice your crust is getting a little too dark, simply cover the edges of the pie with aluminum foil to prevent it from burning.
Pumpkin Filling
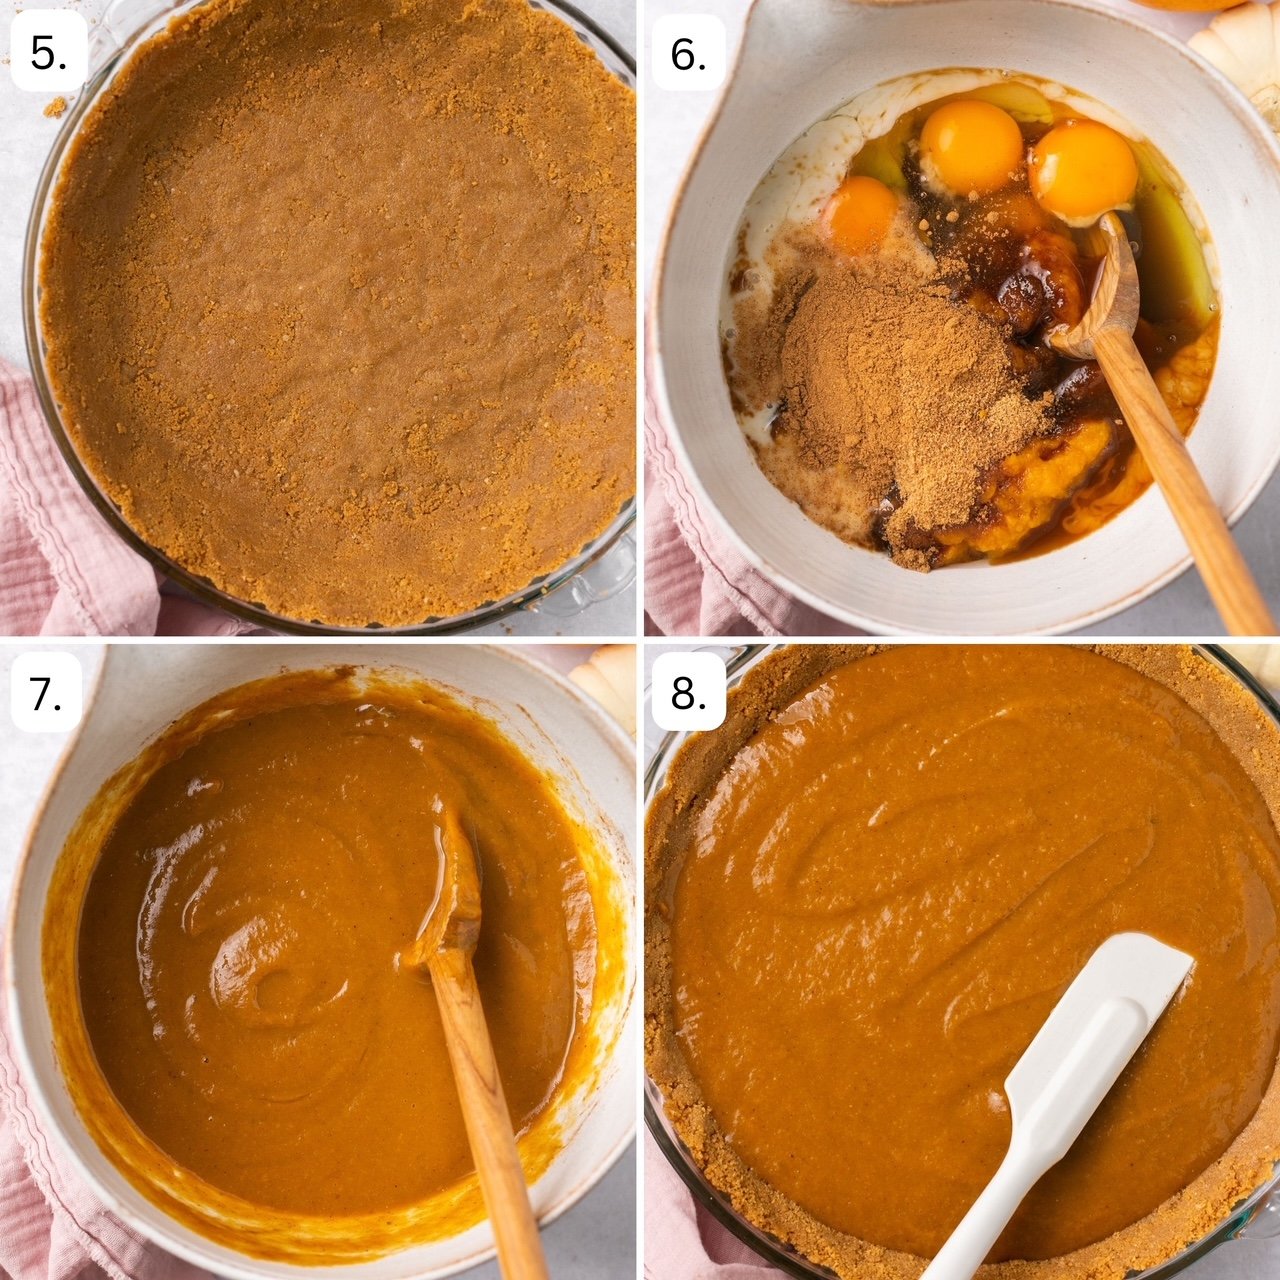
- Add the filling ingredients (pumpkin puree, large eggs, maple syrup, coconut sugar, vanilla extract, almond milk, and pumpkin pie spice) into a large mixing bowl and mix until smooth.
- Pour the mixture into the crust and use a spatula to even it out. Place the pie plate on a baking sheet to catch any spills.
- Bake for 55-60 minutes in the preheated oven. How long you bake pumpkin pie depends on when the center of the pie looks mostly set.
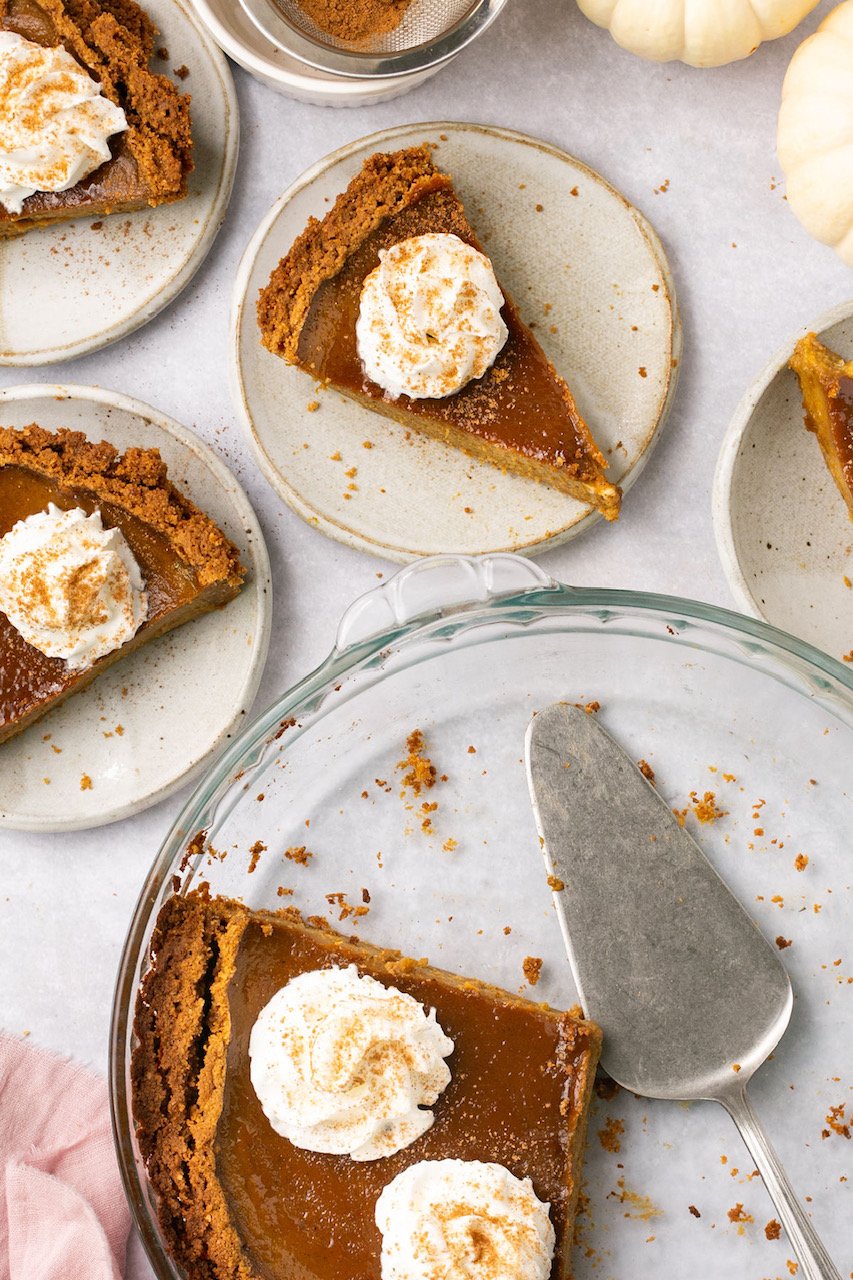
- Let it cool COMPLETELY and place in the fridge for 2 hours before slicing for best results. Top with whipped cream and a dusting of pumpkin pie spice if desired. Enjoy!
Pumpkin Pie Filling Tips
Overmixing: Do not overmix your filling! Simply mix until combined and then stop!
Mary’s Tips & Tricks
How to Serve: Serve this graham cracker crust pumpkin pie with a dollop of dairy or non-dairy whipped cream and sprinkle with pumpkin pie spice! You can serve this gluten free pumpkin pie with graham cracker crust at room temperature or chilled!
Store-bought graham cracker crust: If you don’t want to make your own crust, you can buy one a store-bought pie crust! Feel free to use a regular pie crust, too if you prefer not to use graham crackers.
Storage: Store leftover pumpkin pie in the refrigerator and serve chilled, or let your slice get to room temperature before serving.
Dairy-Free: With a few simple swaps, this delicious pumpkin pie recipe can be dairy free. Swap the butter for vegan butter, and use your favorite dairy-free milk!
Recipe FAQs
Not all graham crackers are gluten free, however, there are some excellent gluten free brands out there than make delicious gluten free craham crackers! I like Pamela’s brand! Other popular brands that make gluten free graham crackers include: Thrive Market, Simple Mills, Schar, and more!
The middle will be jiggly, but set, similar to a custard.
Cracking often happens when the pie cools too fast (like putting it in the refrigerator too soon). Make sure to let the pie cool completely before refrigerating.
Yes! Cool the pie completely, then store it in the freezer for up to 3 months without any whipped cream topping. Defrost overnight in the refrigerator and serve.
If don’t have this on hand and want to make your own, Simply combine 2 tsp ground cinnamon, 1 tsp ground ginger, 1 tsp ground nutmeg, ¾ tsp ground cloves, and ¾ tsp allspice. Then use the 1tbsp + 1tsp and save the rest for another recipe.

More Sweet & Savory Gluten Free Pies

Easy Pumpkin Pie with Graham Cracker Crust
Equipment
Ingredients
- 1.5 cups gluten free graham crackers, I used slightly less than a full package of Pamela's brand gluten free grahams. Any brand works!
- 6 tbsp butter, melted, can sub vegan butter if desired
- 1 can pumpkin puree, 15 oz
- 3 eggs
- ⅓ cup maple syrup
- ⅓ cup coconut sugar
- ¼ cup almond milk
- 1 tsp vanilla extract
- 1 tbsp + 1 tsp pumpkin pie spice
Instructions
- Preheat oven to 350.
- Use a food processor to pulse the graham crackers until they resemble a fine sand texture.
- Measure out exactly 1.5 cups of the graham cracker crumbs and add them to a bowl.
- Add the melted butter and use a fork to mix until well combined.
- Lightly spray a 9-inch pie pan with cooking spray. Use your fingers to press the graham cracker mixture into the bottom of the pie pan and up the sides to form a crust. Use the bottom of a measuring cup to help flatten the crust evenly. Place the crust in the fridge while you make the filling.
- Add the pumpkin puree, eggs, maple syrup, coconut sugar, vanilla extract, almond milk, and pumpkin pie spice into a bowl and mix until smooth. Pour the mixture into the crust and use a spatula to even it out.
- Bake for 55-60 minutes or until the middle looks mostly set.
- Let it cool COMPLETELY and place in the fridge for 2 hours before slicing for best results. Top with whipped cream and a dusting of pumpkin pie spice if desired. Enjoy!
Notes
Gluten Free Pie Crust Tips
Pumpkin Pie Filling Tips
Overmixing: Do not overmix your filling! Simply mix until combined and then stop!Nutrition
All nutrition facts are an estimate and automatically calculated. While I fact check them using My Fitness Pal, please note that they may not always be 100% accurate and depend on ingredients used. Weigh your total and divide by the number of servings for the most accurate grams per serving size.
You may also like


This recipe was originally posted on September 29, 2022 and updated with new content on November 2, 2023.


Thank you for sharing this recipe
I’m using a premade gluten free crust in foil. Would the bake time be different ? It comes i
Bake time should be the same for the filling! No need to bake the crust alone first.
This is the best pumpkin pie I’ve ever had! Graham cracker crust is amazing, filling texture is so smooth. and it’s just the perfect amount of sweet/spice.
Thanks Kitty 🙂
Flavor and texture of the custard is awesome, the only thing is to me 6Tbsp of butter for the crust seems excessive. I only used 2Tbsp, otherwise if would be a runny goo:( turned out great with that substitution. Thank you!
Hi Daniela! Did you crust stay together with only 2 tbsp of butter?! Usually at least 6 is needed to make a firm homemade graham cracker crust. I am glad you enjoyed it regardless!
Could you make this a day ahead?
If so, should I bake it and store in fridge or make it and then bake day of?
I would make it and bake the day before and then serve! Not sure how well the crust will hold up with the filling unbaked overnight.