
This post may contain affiliate links. Please read our disclosure policy.
These gluten-free blueberry lemonade scones are easy to make and full of bright spring flavor! Fresh blueberries and lemon create a citrusy, juicy bite, while very cold butter helps the scones bake up tender and flaky. Finish them with a sweet lemon glaze drizzle that brings all the flavors together!

Quick Look: Blueberry Lemonade Scones
- ⏱️ Prep Time: 15 minutes
- 🍳 Cook Time: 25 minutes
- 🕒 Total Time: 40 minutes
- 👥 Servings: 8
- 📊 Calories: ~332 kcal per serving (based on nutrition panel)
- 🔥 Cook Method: oven-baked at 400 °F
- 👩🍳 Flavor Profile: soft, flaky, and buttery scones with bright flavors of citrus and blueberry.
- ⭐ Difficulty: Easy, perfect breakfast, brunch, or an afternoon treat.
SUMMARIZE & SAVE THIS CONTENT ON
Why You’ll Love Blueberry Lemonade Scones
I love baking fresh treats when spring rolls around! Whether it's a batch of classic blueberry muffins or bright and citrusy lemon poppyseed muffins, there's nothing better than enjoying your morning coffee with something warm from the oven! That's exactly where these gluten-free blueberry lemonade scones come in. They have that classic bakery-style texture with a tender interior and lightly crisp edges, and the grated butter method makes it easy to recreate that flaky, bakery-quality scone right at home!
The blueberry lemonade flavor combo is bright, fresh, and perfect for spring and summer baking. Lemon zest and lemon juice give the dough a refreshing lemonade-style flavor, while juicy blueberries add natural sweetness. A simple lemon glaze on top adds just enough sweetness to balance the citrus without overpowering the fresh fruit.
Ingredients You’ll Need
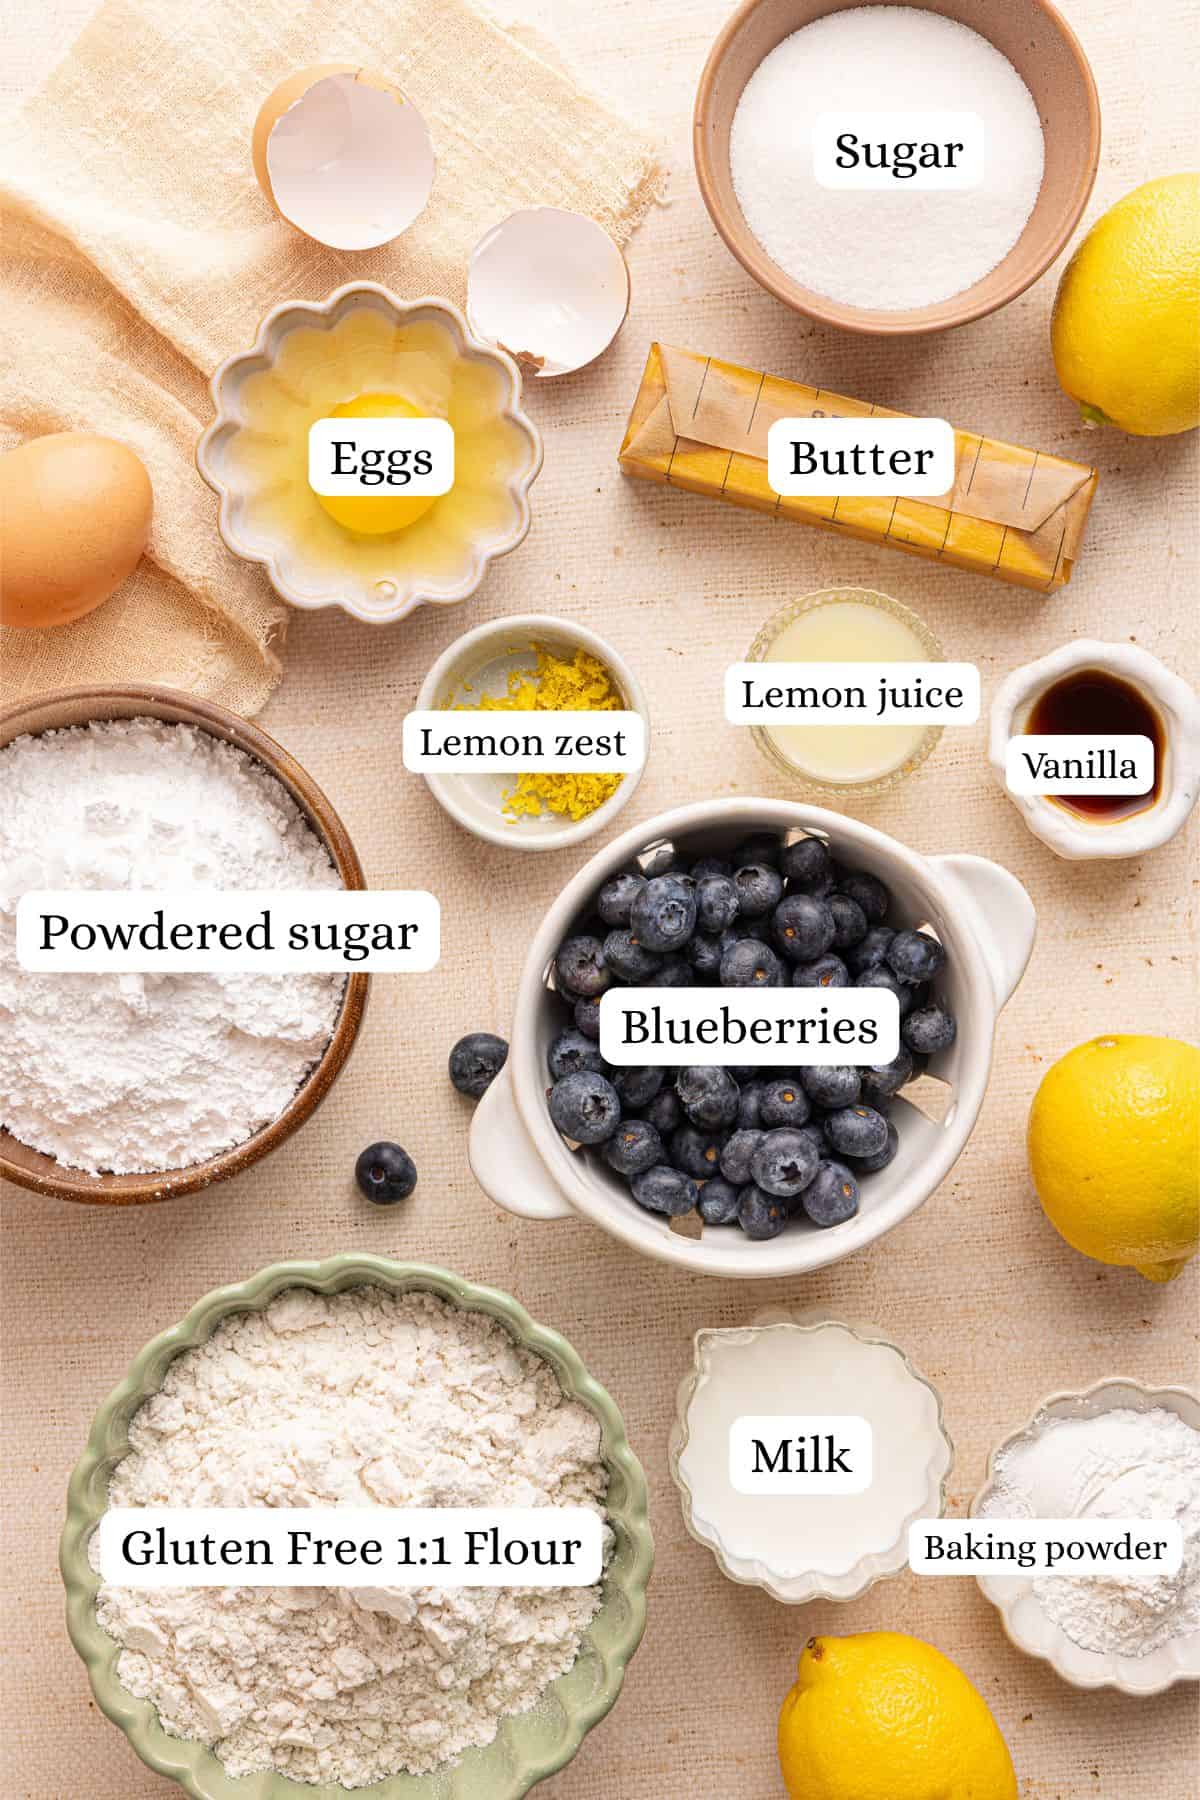
- King Arthur gluten free 1:1 flour: Provides the structure for the dough while keeping the recipe gluten-free and tender!
- Granulated sugar: Adds sweetness and helps the scones brown beautifully in the oven.
- Baking powder: Gives the scones their rise and light texture.
- Lemon zest: Adds bright citrus flavor throughout the dough.
- Salted butter: Very cold or frozen butter is grated into the flour to create flaky layers! Vegan butter, like Miyokos or Kite Hill, can be used for this recipe if you need to be dairy-free!
- Whole milk: Combine with lemon juice to create a quick buttermilk that adds moisture and tenderness. Use your favorite plant-based milk for a dairy-free version!
- Lemon juice: Adds acidity and enhances the lemonade flavor.
- Eggs: Provide structure and richness to the dough.
- Vanilla extract: Adds subtle sweetness and depth of flavor.
- Blueberries: Bring bursts of sweetness and moisture to every bite!
Lemon Glaze
- Organic powdered sugar: Creates the sweet base of the glaze.
- Lemon juice: Adds brightness and balances the sweetness.
How to Make Blueberry Lemonade Scones

Step 1: Preheat the oven to 400. Add the gluten-free flour, sugar, baking powder, and lemon zest together in a bowl and mix.
Step 2: Grate the frozen butter using a box grater. Add the grated butter to the flour mixture.
Step 3: Combine using 2 forks or a pastry cutter. You can also use your fingers. It should be crumbly, and the butter should be pea-sized.
Step 4: Add the milk and lemon juice to a separate bowl and whisk. This is your “buttermilk”. Add one of the eggs and vanilla and continue to whisk until smooth.
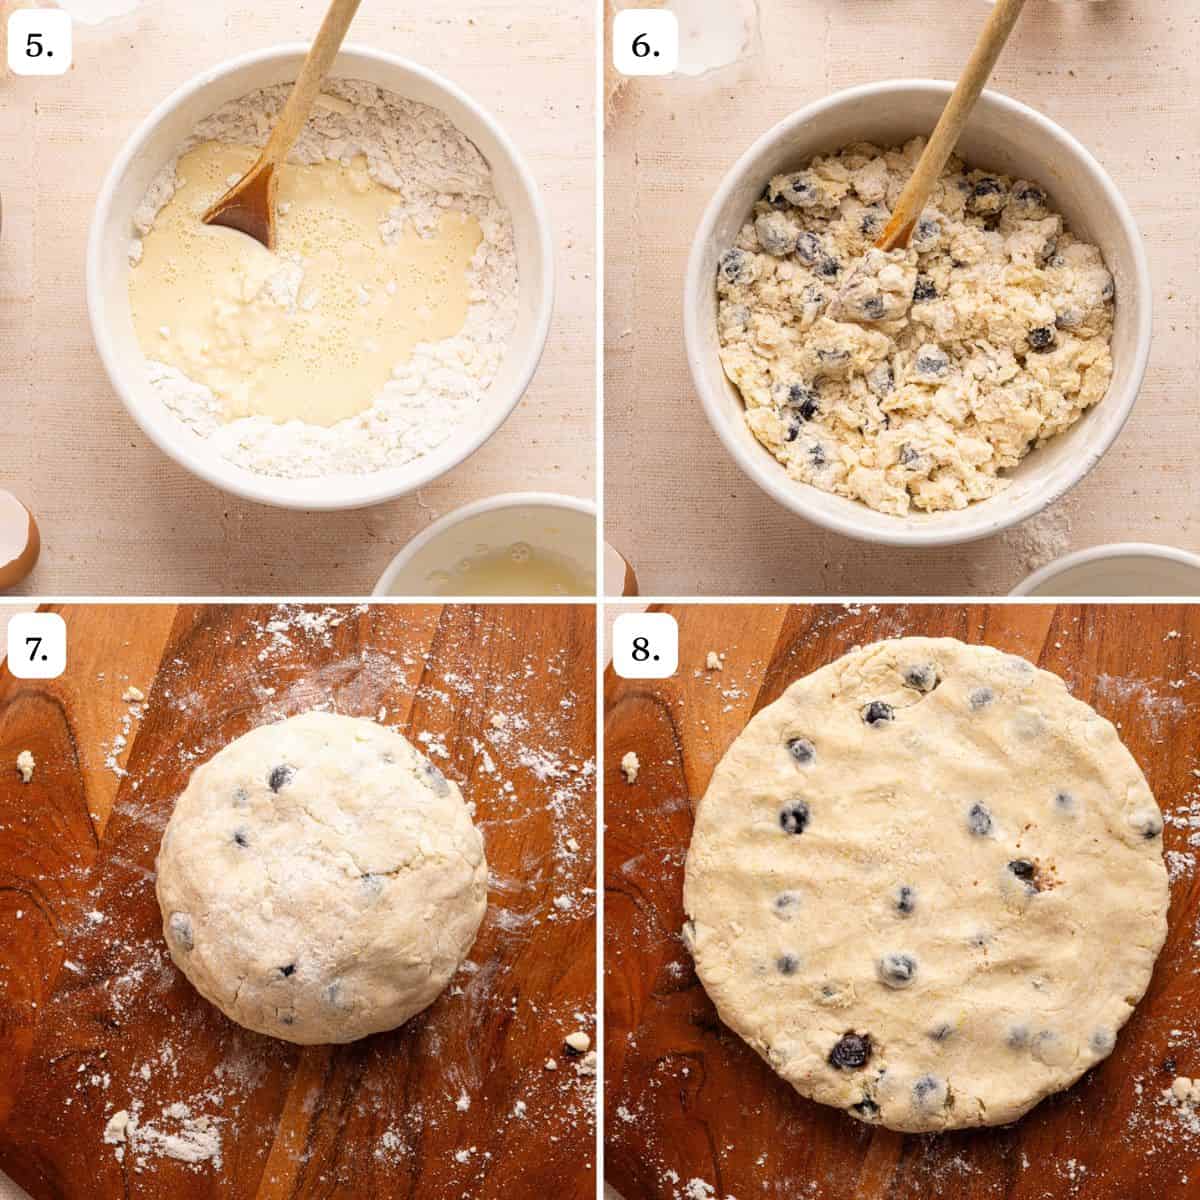
Step 5: Add the wet ingredients into the bowl with the butter/flour mixture.
Step 6: Add the blueberries and mix until just combined – do not overmix!
Step 7: Transfer the mixture to a lightly-floured countertop or work surface. Add a little gluten-free flour to your hands so the dough doesn’t stick, then work the dough into a ball. If it’s too dry, add 1 tbsp milk at a time until the desired consistency is reached.
Step 8: Press it down into an 8-inch disc shape. Refrigerating the dough prior to baking isn’t necessary, but you can refrigerate it in plastic wrap overnight if preferred.

Step 9: When ready to bake, cut the dough into 8 triangular wedges.
Step 10: Place the scones 2 inches apart on a large baking sheet lined with parchment paper. Use a fork to beat the remaining egg, then brush some of the egg wash over each scone. Sprinkle each one with some of the granulated sugar.
Step 11: Bake for 20-24 minutes or until the edges look crispy and the tops are golden brown. Remove from the oven and let them cool for 30 minutes. Whisk the powdered sugar and lemon juice together to form the glaze.
Step 12: Drizzle it over the tops of each of the scones. It will harden and set as it sits. Enjoy!
If you love making scones at home, you'll also love my gluten-free scones with orange and cranberries (and the gluten-free muffin version!) - the dough is very similar to these blueberry lemonade scones, just with a zesty orange and cranberry twist!

Tips for Perfect Scones
- Use frozen or very cold butter. Grating frozen butter into the dough helps create small pockets of fat that melt during baking, which creates those flaky layers we love!
- Mix the dough gently. Overmixing the dough can lead to dense scones instead of a light texture.
- Fold blueberries carefully. This helps prevent them from bursting and turning the dough purple.
- Don't overwork the dough. Handle the dough just enough to bring it together into a disc.
- Bake until lightly golden. The tops should look golden and the edges slightly crisp when the scones are finished baking!

Storage Tips
- Store these gluten-free scones in an airtight container at room temperature for up to 2 days. If your kitchen is warm, you can store them in the fridge to keep the glaze from becoming too soft!
- For longer storage, place the scones in an airtight container or freezer-safe bag and freeze for up to 2 months. When ready to enjoy, let them thaw at room temperature or warm them gently in the oven at 300°F for about 8-10 minutes until heated through.
- If possible, freeze the scones before adding the glaze. Once reheated, you can drizzle the lemon glaze on top so they taste freshly baked!
Recipe FAQs
Dense scones usually happen when the dough is overmixed or the butter gets too warm. Use very cold butter and mix the dough just until it comes together to help create light, flaky layers!
Toss the blueberries lightly in gluten-free flour before adding them to the dough. This helps absorb extra moisture and keeps them evenly distributed while the scones bake!
The key to light and fluffy scones is using very cold butter and mixing the dough gently. Cold butter creates small pockets of steam while baking, which helps form flaky layers. Avoid overmixing the dough, as that can make the scones dense instead of tender!
Yes! You can make these scones dairy-free by replacing the butter with a dairy-free butter substitute. Choose a firm plant-based butter and keep it cold so the scones still bake up tender with lightly crisp edges.
These blueberry lemonade scones are tender, flaky, and filled with bright citrus flavor and sweet blueberries. They're easy to make and perfect for enjoying with coffee, serving at brunch, or baking for a weekend treat!
More Sweet Breakfast Recipes

Gluten-Free Mini Muffins (Little Bites Copycat)

Best Gluten-Free Protein Banana Bread with Chocolate Chips


Double Chocolate Overnight Oats Recipe

Easy Blueberry Lemonade Scones (Gluten-Free)
Equipment
Ingredients
- 2 cups King Arthur Gluten Free 1:1 Flour
- ⅓ cup granulated sugar, + 1 tbsp for dusting
- 2 tbsp baking powder, make sure to look for gluten free
- 1 tbsp lemon zest, (about the zest from 1 whole lemon)
- ½ cup salted butter, frozen or very cold
- ½ cup whole milk
- 1 tsp lemon juice
- 2 eggs, divided
- 1 tsp vanilla extract
- 1 cup blueberries
Lemon Glaze
- 1 cup organic powder sugar
- 2.5 tbsp lemon juice
Instructions
- Preheat oven to 400.
- Add the gluten free flour, sugar, baking powder, and lemon zest together in a bowl and mix.
- Grate the frozen butter using a box grater. Add the grated butter to the flour mixture and combine using 2 forks or a pastry cutter. You can also use your fingers. It should be crumbly and the butter should be pea-sized.
- Add the milk and lemon juice to a separate bowl and whisk. This is your "buttermilk". Add one of the eggs and vanilla and continue to whisk until smooth.
- Add the wet ingredients into the bowl with the butter / flour mixture and add the blueberries. Mix until just combined – do not overmix!
- Transfer the mixture to a lightly-floured countertop or work surface. Add a little gluten free flour to your hands so the dough doesn't stick, then work the dough into a ball. If it's too dry, add 1 tbsp milk at a time until the desired consistency is reached. Press it down into an 8-inch disc shape. Refrigerating the dough prior to baking isn't necessary, but you can refrigerate in plastic wrap overnight if preferred. When ready to bake, cut the dough into 8 triangle wedges.
- Place them scones 2 inches apart on a large baking sheet lined with parchment paper. Use a fork to beat the remaining egg, then brush some of the egg wash over each scone. Sprinkle each one with some of the granulated sugar.
- Bake for 20-24 minutes or until the edges look crispy and the tops are golden brown. Remove from the oven and let them cool for 30 minutes.
- Whisk the powdered sugar and lemon juice together to form the glaze. Drizzle it over the tops of each of the scones. It will harden and set as it sits. Enjoy!
Notes
- Use frozen or very cold butter. Grating frozen butter into the dough helps create small pockets of fat that melt during baking, which creates those flaky layers we love!
- Mix the dough gently. Overmixing the dough can lead to dense scones instead of a light texture.
- Fold blueberries carefully. This helps prevent them from bursting and turning the dough purple.
- Don't overwork the dough. Handle the dough just enough to bring it together into a disc.
- Bake until lightly golden. The tops should look golden and the edges slightly crisp when the scones are finished baking!
- Store these gluten-free scones in an airtight container at room temperature for up to 2 days. If your kitchen is warm, you can store them in the fridge to keep the glaze from becoming too soft!
- For longer storage, place the scones in an airtight container or freezer-safe bag and freeze for up to 2 months. When ready to enjoy, let them thaw at room temperature or warm them gently in the oven at 300°F for about 8-10 minutes until heated through.
- If possible, freeze the scones before adding the glaze. Once reheated, you can drizzle the lemon glaze on top so they taste freshly baked!
Nutrition
All nutrition facts are an estimate and automatically calculated. While I fact check them using My Fitness Pal, please note that they may not always be 100% accurate and depend on ingredients used. Weigh your total and divide by the number of servings for the most accurate grams per serving size.


